Monday, July 23, 2012

ibots nQSError: 77006 in obiee


When we are running iBots on two Presentation Services (PS) servers that are non clustered, most of the time we get  the following error:

Log file NQiBot-xx-xxx.x.err – shows:
+++ ThreadID: 8d0 : 2010-02-12 09:57:03.000
[nQSError: 77006] Oracle BI Presentation Server Error: A fatal error occurred while processing the request. The server responded with: Path not found (/users/administrator/_ibots/Open SRs Todate)
Error Codes: U9KP7Q94
.
Error Codes: AGEGTYVF
+++ ThreadID: 8d0 : 2010-02-12 09:57:03.000
iBotID: /users/administrator/_ibots/Open SRs Todate
…Trying main iBot loop again.
Solution :
Just go to the  Job Manager—>Configuration Option—>Under Ibot—> add second presentation servers machine name:port number. and restart scheduler service
ex. localhost:9710, localhost:9711


Thanks,
Satya Ranki Reddy

Thursday, July 19, 2012


Different ways to Manage Cache in OBIEE


One of the most powerful features of OBIEE is the way it uses it’s cache. Good cache management can really boost your performance. From the system management point of view there are a couple of tips and tricks to influence the cache performance.


Here are few Examples of Managing Cache.


1. Purging the whole cache.


If you have a completed database reload or want to do some performance testing with your repository you might want to purge the whole cache.
Put the following in a .txt file in your maintenance directory


// Purge complete cache
// executed by cmd string:
// nqcmd -d AnalyticsWeb -u Administrator -p Administrator -s


c:\obiee\mscripts\purgecompletecache.txt Call SAPurgeAllCache()


You can execute this from the commandline: nqcmd -d AnalyticsWeb -u Administrator -p Administrator -s c:\obiee\mscripts\purgecompletecache.txt

2. Purging the cache by table


If you have a major update of your dimensional tables you might want to clear the cache for just one table.
Put the following in a .txt file in your maintenance directory:


// Purge complete cache
// FileName: PurgeTableCache.txt
// executed by cmd string:
// nqcmd -d AnalyticsWeb -u Administrator -p Administrator -s
c:\obiee\mscripts\PurgeTableCache.txt


Call SAPurgeCacheByTable( ‘AQIES_SH’, NULL, ‘SH’, ‘TBLTRY’ );


You can execute this from the commandline: nqcmd -d AnalyticsWeb -u Administrator -p Administrator -s c:\obiee\mscripts\PurgeTableCache.txt


3. Purging the cache by query


Sometimes you only want to purge only “old” data from your cache.
Put the following in a .txt. file in your maintenance directory:


// Purge cache by Query
// FileName: PurgeQueryCache.txt
// executed by cmd string:
// nqcmd -d AnalyticsWeb -u Administrator -p Administrator -s
c:\obiee\mscripts\PurgeQueryCache.txt


Call SAPurgeCacheByQuery(’SELECT * FROM Transactions
WHERE Transactions.Date_entered <= TIMESTAMPADD(SQL_TSI_YEAR, -1,NOW())’); // The “query” line must be one continues line! You can execute this from the commandline: nqcmd -d AnalyticsWeb -u Administrator -p Administrator -s c:\obiee\mscripts\PurgeQueryCache.txt


4 Purging the cache by database

Put the following in a .txt. file in your maintenance directory:
// Purge cache by Database
// FileName: PurgeDataBaseCache.txt
// executed by cmd string:
// nqcmd -d AnalyticsWeb -u Administrator -p Administrator -s
c:\obiee\mscripts\PurgeDataBaseCache.txt


Call SAPurgeCacheByDatabase( ‘AQIES_SH’ );


// The “dbName” is the OBIEE name!


You can execute this from the commandline: nqcmd -d AnalyticsWeb -u Administrator -p Administrator -s c:\obiee\mscripts\PurgeDataBaseCache.txt


You can also purge cache direct from Dashboard by following the given steps.


Goto Settings—>Administration —> Issue sql


call sapurgeallcache() and click issues sql..below is the screen shot


Thanks to-http://techblog.aqies.com/2011/04/11/cache-management-in-obiee/


PRESENTATION CACHEBy default, the cache files for the presentation server reside in the \tmp directory within the respective subdirectories sawcharts, sawrptcache and sawvc; while the xml cache files lying in the \tmp folder itself.

Chart Cache - \OracleBIData\tmp\sawcharts\
Report Cache - \OracleBIData\tmp\sawrptcache\
State Pool Cache - \OracleBIData\tmp\sawvc\
XML Cache - \OracleBIData\tmp\
See image below for an example of how to modify the instance config to explicitly change the default presentation cache directory locations.


Additionally, and only specific to the XML Cache directory location change, you must also make a change to the nqconfig file as follows:

WORK_DIRECTORY_PATHS = "C:\DataSources\Cache\tmp";

ENABLE PRESENTATION CACHE
In instanceconfig.xml file ( \OracleBIData\web\config\instanceconfig.xml )

<ServerInstance>
<Cache>
<Query>
<MaxEntries>100</MaxEntries>
<MaxExpireMinutes>60</MaxExpireMinutes>
<MinExpireMinutes>10</MinExpireMinutes>
<MinUserExpireMinutes>10</MinUserExpireMinutes>
</Query>
</Cache>
<ServerInstance>


DISABLE PRESENTATION CACHE FOR ENTIRE APPLICATION
In instanceconfig.xml file ( \OracleBIData\web\config\instanceconfig.xml )
<ServerInstance>
<ForceRefresh>TRUE</ForceRefresh>
</ServerInstance>

BYPASS PRESENTATION CACHE


Sometimes you want to bypass the presentation / cache for development purposes. Or more often when you get weird write back behaviour. Add this to the instanceconfig file:


<CacheMaxExpireMinutes>-1</CacheMaxExpireMinutes>

<CacheMinExpireMinutes>-1</CacheMinExpireMinutes>

<CacheMinUserExpireMinutes>-1</CacheMinUserExpireMinutes>

CLEAR PRESENTATION CACHE

Via Oracle BI Web Application

Settings-->Administration-->Reload Files and Metadata-->Finished


or


Via Server Service

Shut down Presentation Services to remove the files for the Presentation Cache


**If you delete cache files when Presentation Services are still running or SAW does not shut down cleanly, then various cache files might be left on disk.


BI SERVER CACHE

By default, the BI Server Cache is stored in the \OracleBIData\cache\ directory and stored as NQS*.tbl files.


BI SERVER CACHE FILE NAME FORMAT


NQS(Prefix)_VMVGGOBI(Originating Server Name)_733547(Days passed since 1-1-0000)40458(Seconds passed since last midnight)_00000006(Incremental number since last BI server start).TBL


ENABLE BI SERVER CACHE

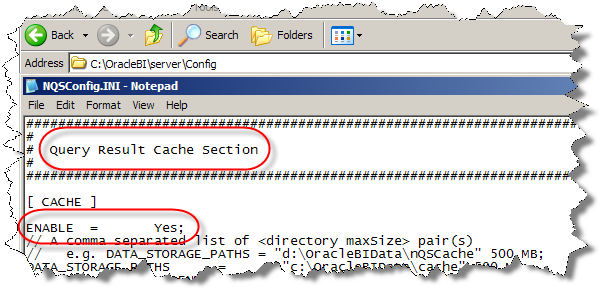
To enable the query cache for the entire application, you must set the ENABLE cache parameter value to YES in the file nqsconfig. ( \OracleBI\server\Config\NQSConfig.INI )

ENABLE = YES;


DISABLE BI SERVER CACHE FOR ENTIRE APPLICATION

To disable the query cache for the entire application, you must set the ENABLE cache parameter value to NO in the file nqsconfig. ( \OracleBI\server\Config\NQSConfig.INI )

ENABLE = NO;


BYPASS BI SERVER CACHE FOR SINGLE REPORT

In Answers, goto Advanced Reporting tab when building report, set Prefix value to following:

SET VARIABLE DISABLE_CACHE_HIT=1, DISABLE_CACHE_SEED=1, LOGLEVEL=7;


CLEAR BI SERVER CACHE

To clear the BI Server Cache files, run the following command file: \OracleBI\server\cache_purge_reseed\call.bat


This calls the purge.txt file, which simply contains the following command:

call SAPurgeAllCache();


This will clear the BI Server Cache (.TBL) files in the Cache directory:

\OracleBIData\cache\


or


An alternate way of doing this is via the OBI Admin Tool, using the Cache management feature.


BI SERVER CACHE PERSISTENCE


...When a dynamic repository variable is updated, cache is automatically purged. This is designed behavior. Cache will be invalidated (i.e. purged) whenever the initialization block that populates dynamic repository variable is refreshed. The reason that refreshing a variable purges cache is that if a variable was used in a calculation, and the variable changed, then cache would have invalid data. By purging cache when a variable changes, this problem is eliminated.


Since this is the designed functionality, Change Request 12-EOHPZ3 titled ‘Repository variable refresh purges cache’ exists on our database to address a product enhancement request. The workaround is to go through the dynamic repository variables and verify that the variables are being refreshed at the correct interval. If a variable needs to be refreshed daily, there may be a need to set up a cache seeding .bat file that runs after the dynamic variable has been updated. If the cache seeding .bat file runs prior to the refresh of the dynamic variable refresh, then the cache will be lost.


BI SERVER CACHE ENABLED BUT NOT CACHING

OBIEE cache is enabled, but why is the query not cached?...


Non-cacheable SQL function: If a request contains certain SQL functions, OBIEE will not cache the query. The functions are CURRENT_TIMESTAMP, CURRENT_DATE, CURRENT_TIME, RAND, POPULATE. OBIEE will also not cache queries that contain parameter markers.


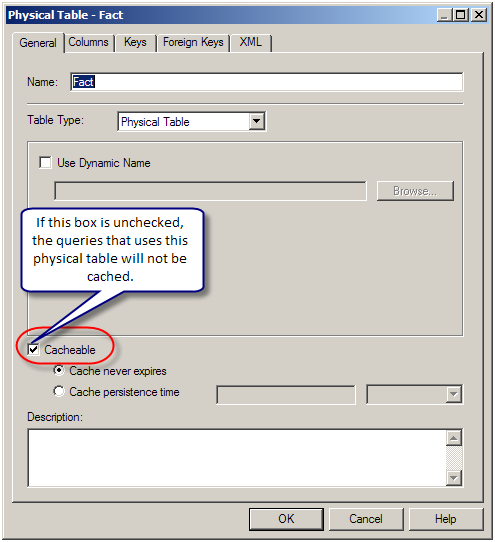
Non-cacheable Table: Physical tables in the OBIEE repository can be marked ‘non-cacheable’. If a query makes a reference to a table that has been marked as non-cacheable, then the results are not cached even if all other tables are marked as cacheable.


Query got a cache hit: In general, if the query gets a cache hit on a previously cached query, then the results of the current query are not added to the cache. Note: The only exception is the query hits that are aggregate “roll-up” hits, will be added to the cache if the nqsconfig.ini parameter POPULATE_AGGREGATE_ROLLUP_HITS has been set to Yes.


Caching is not configured: Caching is not enabled in NQSConfig.ini file.


Result set too big: The query result set may have too many rows, or may consume too many bytes. The row-count limitation is controlled by the MAX_ROWS_PER_CACHE_ENTRY nqsconfig.ini parameter. The default is 100,000 rows. The query result set max-bytes is controlled by the MAX_CACHE_ENTRY_SIZE nqsconfig.ini parameter. The default value is 1 MB. Note: the 1MB default is fairly small. Data typically becomes “bigger” when it enters OBIEE. This is primarily due to Unicode expansion of strings (a 2x or 4x multiplier). In addition to Unicode expansion, rows also get wider due to : (1) column alignment (typically double-word alignment), (2) nullable column representation, and (3) pad bytes.


Bad cache configuration: This should be rare, but if the MAX_CACHE_ENTRY_SIZE parameter is bigger than the DATA_STORAGE_PATHS specified capacity, then nothing can possibly be added to the cache.


Query execution is cancelled: If the query is cancelled from the presentation server or if a timeout has occurred, cache is not created.


OBIEE Server is clustered: Only the queries that fall under “Cache Seeding” family are propagated throughout the cluster. Other queries are stored locally. If a query is generated using OBIEE Server node 1, the cache is created on OBIEE Server node 1 and is not propagated to OBIEE Server node 2


Thanks,


Satya Ranki Reddy


The use of an Oracle BI Server event polling table (event table) is a way to notify the Oracle BI Server that one or more physical tables have been updated and then that the query cache entries are stale.
Each row that is added to an event table describes a single update event, such as an update occurring to a Product table.
The Oracle BI Server cache system reads rows from, or polls, the event table, extracts the physical table information from the rows, and purges stale cache entries that reference those physical tables.
The event table is a physical table that resides on a database accessible to the Oracle BI Server. Regardless of where it resides—in its own database, or in a database with other tables—it requires a fixed schema.
It is normally exposed only in the Physical layer of the Administration Tool, where it is identified in the Physical Table dialog box as being an Oracle BI Server event table.
It does require the event table to be populated each time a database table is updated. Also, because there is a polling interval in which the cache is not completely up to date, there is always the potential for stale data in the cache.
A typical method of updating the event table is to include SQL INSERT statements in the extraction and load scripts or programs that populate the databases. The INSERT statements add one row to the event table each time a physical table is modified.
After this process is in place and the event table is configured in the Oracle BI repository, cache invalidation occurs automatically. As long as the scripts that update the event table are accurately recording changes to the tables, stale cache entries are purged automatically at the specified polling intervals.
You can set up a physical event polling table on each physical database to monitor changes in the database. The event table should be updated every time a table in the database changes.
The event table needs to have the structure shown below. The column names for the event table are suggested; you can use any names you want. However, the order of the columns has to be the same in the physical layer of the repository (then by alphabetic ascendant order)

Column Name by alphabetic ascendant order Data Type Null Description Advise
CatalogName CHAR or VARCHAR Yes The name of the catalog where the physical table that was updated resides. Populate the CatalogName column only if the event table does not reside in the same database as the physical tables that were updated. Otherwise, set it to the null value.
DatabaseName CHAR or VARCHAR Yes The name of the database where the physical table that was updated resides. Populate the DatabaseName column only if the event table does not reside in the same database as the physical tables that were updated. Otherwise, set it to the null value.
Other CHAR or VARCHAR Yes Reserved for future enhancements. This column must be set to a null value.
SchemaName CHAR or VARCHAR Yes The name of the schema where the physical table that was updated resides. Populate the SchemaName column only if the event table does not reside in the same database as the physical tables being updated. Otherwise, set it to the null value.
TableName CHAR or VARCHAR No The name of the physical table that was updated. The name has to match the name defined for the table in the Physical layer of the Administration Tool.
UpdateTime DATETIME No The time when the update to the event table occurs. This needs to be a key (unique) value that increases for each row added to the event table. To make sure a unique and increasing value, specify the current timestamp as a default value for the column. For example, specify DEFAULT CURRENT_TIMESTAMP for Oracle 8i.
UpdateType INTEGER No Specify a value of 1 in the update script to indicate a standard update. Other values are reserved for future use.

Step by Step for the Oracle database

Create the user

CREATE user OBIEE_REPO IDENTIFIED BY OBIEE_REPO;
GRANT connect,resource TO OBIEE_REPO;

Create the table

In 10g: Obi_Home\bi\server\Schema\SAEPT.Oracle.sql
--------------------------------------
--  Create the Event Polling Table. --
--------------------------------------
CREATE TABLE S_NQ_EPT (
  UPDATE_TYPE    DECIMAL(10,0)  DEFAULT 1       NOT NULL,
  UPDATE_TS      DATE           DEFAULT SYSDATE NOT NULL,
  DATABASE_NAME  VARCHAR2(120)                      NULL,
  CATALOG_NAME   VARCHAR2(120)                      NULL,
  SCHEMA_NAME    VARCHAR2(120)                      NULL,
  TABLE_NAME     VARCHAR2(120)                  NOT NULL,
  OTHER_RESERVED VARCHAR2(120)  DEFAULT NULL        NULL 
) ;
In 11g, the table is present in the BIPLATFORM metadata repository.

Import the table with ODBC (not with OCI)

Import the table with ODBC and change the call interface connection pool to OCI.
If you don't have an Oracle ODBC connection, you can simply suppress the table after importation with OCI and copy paste on the schema OBIEE_REPO the following UDML statmement:
DECLARE TABLE "ORCL".."OBIEE_REPO"."S_NQ_EPT" AS "S_NQ_EPT" NO INTERSECTION PRIVILEGES ( READ);
DECLARE COLUMN "ORCL".."OBIEE_REPO"."S_NQ_EPT"."UPDATE_TYPE" AS "UPDATE_TYPE" TYPE "DOUBLE" 
        PRECISION 10 SCALE 0  NOT NULLABLE PRIVILEGES ( READ);
DECLARE COLUMN "ORCL".."OBIEE_REPO"."S_NQ_EPT"."UPDATE_TS" AS "UPDATE_TS" TYPE "TIMESTAMP" 
        PRECISION 19 SCALE 0  NOT NULLABLE PRIVILEGES ( READ);
DECLARE COLUMN "ORCL".."OBIEE_REPO"."S_NQ_EPT"."DATABASE_NAME" AS "DATABASE_NAME" TYPE "VARCHAR" 
        PRECISION 120 SCALE 0  NULLABLE PRIVILEGES ( READ);
DECLARE COLUMN "ORCL".."OBIEE_REPO"."S_NQ_EPT"."CATALOG_NAME" AS "CATALOG_NAME" TYPE "VARCHAR" 
        PRECISION 120 SCALE 0  NULLABLE PRIVILEGES ( READ);
DECLARE COLUMN "ORCL".."OBIEE_REPO"."S_NQ_EPT"."SCHEMA_NAME" AS "SCHEMA_NAME" TYPE "VARCHAR" 
        PRECISION 120 SCALE 0  NULLABLE PRIVILEGES ( READ);
DECLARE COLUMN "ORCL".."OBIEE_REPO"."S_NQ_EPT"."TABLE_NAME" AS "TABLE_NAME" TYPE "VARCHAR" 
        PRECISION 120 SCALE 0  NOT NULLABLE PRIVILEGES ( READ);
DECLARE COLUMN "ORCL".."OBIEE_REPO"."S_NQ_EPT"."OTHER_RESERVED" AS "OTHER_RESERVED" TYPE "VARCHAR" 
        PRECISION 120 SCALE 0  NULLABLE PRIVILEGES ( READ);
When you import the table with OCI, the UDML metadata are not the same. They have different syntax for the definition of a column. You can remark in the two below statement that the OCI metadata has an extra EXTERNAL clause that you don't find in the ODBC metadata. Declaration of the column CATALOGNAME after import with OCI:
DECLARE COLUMN "ORCL".."OBIEE_REPO"."S_NQ_EPT"."CATALOGNAME" AS "CATALOGNAME" EXTERNAL "obiee_repo" 
TYPE "VARCHAR" PRECISION 40 SCALE 0  NULLABLE  PRIVILEGES ( READ);
Declaration of the column CATALOGNAME after import with ODBC:
DECLARE COLUMN "ORCL".."OBIEE_REPO"."S_NQ_EPT"."CATALOGNAME" AS "CATALOGNAME" 
TYPE "VARCHAR" PRECISION 40 SCALE 0  NULLABLE PRIVILEGES ( READ);

Define the table as an event table


You can restart the Oracle BI Server service to be sure that the table is now seen as a good event table. If you have any error in the NQServer.log during the start, correct them.

Test

  • Create a report with a product attribute to seed the cache.
  • Insert a row to give to OBIEE the instruction to delete the cache from all SQL query cache which contain the product table.
INSERT
INTO
  S_NQ_EPT
  (
    update_type,
    update_ts,
    database_name,
    catalog_name,
    schema_name,
    table_name,
    other_reserved
  )
  VALUES
  (
    1,
    sysdate,
    'orcl SH',
    NULL,
    'SH',
    'PRODUCTS',
    NULL
  )
  • Wait the polling interval frequency and verify that the cache entry is deleted and that you can find the below trace in the NQQuery.log file.
+++Administrator:fffe0000:fffe001c:----2010/06/16 00:45:33

-------------------- Sending query to database named ORCL (id: <<13628>>):

select T4660.UPDATE_TYPE as c1,
     T4660.UPDATE_TS as c2,
     T4660.DATABASE_NAME as c3,
     T4660.CATALOG_NAME as c4,
     T4660.SCHEMA_NAME as c5,
     T4660.TABLE_NAME as c6
from 
     S_NQ_EPT T4660
where  ( T4660.OTHER_RESERVED in ('') or T4660.OTHER_RESERVED is null ) 
minus
select T4660.UPDATE_TYPE as c1,
     T4660.UPDATE_TS as c2,
     T4660.DATABASE_NAME as c3,
     T4660.CATALOG_NAME as c4,
     T4660.SCHEMA_NAME as c5,
     T4660.TABLE_NAME as c6
from 
     S_NQ_EPT T4660
where  ( T4660.OTHER_RESERVED = 'oracle10g' ) 


+++Administrator:fffe0000:fffe001c:----2010/06/16 00:45:33

-------------------- Sending query to database named ORCL (id: <<13671>>):

insert into 
     S_NQ_EPT("UPDATE_TYPE", "UPDATE_TS", "DATABASE_NAME", "CATALOG_NAME", "SCHEMA_NAME", "TABLE_NAME", "OTHER_RESERVED") 
values (1, TIMESTAMP '2010-06-16 00:44:53', 'orcl SH', '', 'SH', 'PRODUCTS', 'oracle10g')


+++Administrator:fffe0000:fffe0003:----2010/06/16 00:45:33

-------------------- Cache Purge of query:
SET VARIABLE QUERY_SRC_CD='Report',SAW_SRC_PATH='/users/administrator/cache/answers_with_product';
SELECT Calendar."Calendar Year" saw_0, Products."Prod Category" saw_1, "Sales Facts"."Amount Sold" 
saw_2 FROM SH ORDER BY saw_0, saw_1


+++Administrator:fffe0000:fffe001c:----2010/06/16 00:45:33

-------------------- Sending query to database named ORCL (id: <<13672>>):

select T4660.UPDATE_TIME as c1
from 
      S_NQ_EPT T4660
where  ( T4660.OTHER_RESERVED = 'oracle10g' ) 
group by T4660.UPDATE_TS
having count(T4660.UPDATE_TS) = 1


+++Administrator:fffe0000:fffe001c:----2010/06/16 00:45:33

-------------------- Sending query to database named ORCL (id: <<13716>>):

delete from 
      S_NQ_EPT where  S_NQ_EPT.UPDATE_TS = TIMESTAMP '2010-06-16 00:44:53'

Support

The cache polling event table has an incorrect schema

In the NQServer.log file
[56001] The cache polling event table S_NQ_EPT has an incorrect schema.
You must import the event table via ODBC 3.5. When you use OCI, the UDML of the table has a difference. You can then change the call interface to OCI.

The physical table in a cache polled row does not exist

In the NQServer.log file
[55001] The physical table ORCL::SH:PRODUCTS in a cache polled row does not exist.
Verify the location of your table.
For instance, in my case, the good location was “orcl SH::SH:PRODUCTS” as you can see in the picture below.

The cache polling SELECT query failed for table

When you get the following trace in NQQuery.log, it's because:
  • your event table was deleted
  • or that the name in the physical layer doesn't match any more the table in the database.
2010-06-15 07:52:28  [55003] The cache polling SELECT query failed for table S_NQ_EPT.
2010-06-15 07:52:28  [nQSError: 17001] Oracle Error code: 942, message: ORA-00942: table or view does not exist
at OCI call OCIStmtExecute. 
                     [nQSError: 17010] SQL statement preparation failed.
2010-06-15 07:52:28  [55005] The cache polling delete statement failed for table S_NQ_EPT.

faulting module NQSCache.dll

Oracle BI Server can literally crash when you use the example script that is given in the documentation (with an OTHER column). You can find this information in the even viewer of Windows.
Description: Faulting application NQSServer.exe, version 10.1.3.4, faulting module NQSCache.dll, 
version 10.1.3.4, fault address 0x00016b43.  
Solution: change the structure of the table by using the script in the schema directory (such as above in the document)

Thanks,
Satya Ranki Reddy

Cache Management

Cache Management


     Cache is the most important feature used for obtaining an optimized report and dashboard performance. However when managed poorly, it might lead to stale data appearing in reports. Hence cache must be purged at intervals based on the right perception. E.g. cache must be deleted after ETL has completed the data load to the warehouse tables.

    Cache management in OBIEE is done from multiple points and this is determined by who is purging it.

    Cache Access Point
    OBIEE Role
    Online RPD file
    Developer
    Analysis Page
    Report End Users and Developers
    Scripts
    Administrators
    Enabling cache
    Caching must be enabled first for this to be managed. To do this open the nqsconfig file and edit the following (in red)
    ###############################################################################
    #
    #  Query Result Cache Section
    #
    ###############################################################################
    [CACHE]
    ENABLE = YES;  # This Configuration setting is managed by Oracle Business Intelligence Enterprise Manager 
    As this option is controlled from Enterprise Manager, restarting the BI Service will reset this option to what is define is Enterprise Manager. Hence for permanently setting this option to Yes/NO this must be done in EM. Navigation : Open EM > Business Intelligence > Coreapplication > Capacity Management > Performance
    See Screenshot
      Deleting cache from RPD
    Open rpd in online mode
    Navigate to Manage>Cache
    The cache manager screen shows the various SQL stored in Cache
    One may see the sql related to each cache entry using “Show SQL”.
    “Show SQL” option of the above step opens up a window with the Logical SQL of the cached query
    “Purge” can be used to delete one or more cache entries.
    Create a connection as shown above with Database as ODBC Basic
    Create a connection pool called AnalyticsWeb with call interface as ODBC 2.0
    Create a new Analysis
    Select  “Create Direct Database Request”
    Specify the Connection Pool created in first step(this connection pool is created in rpd exclusively for cache management, don’t use the one for reports)
    SQL Statement : Specify the OBIEE command for deleting cache, it can be either of the following :

    Call SAPurgeAllCache()  -- Deletes all cache info
    Call SAPurgeCacheByTable( 'Datwarehouse',  '','DWH', 'XW_SALES_F');  -- deletes specific table cache
    Call SAPurgeCacheByDatabase( 'Datwarehouse' );   -- Deletes all cache related to a specific database
    Call SAPurgeCacheByQuery('SELECT   0 s_0,    "Sales Subject Area"."Time - Dimension"."MONTH_NAME" s_1, "Sales Subject Area"."Fact Sales"."COST_PRICE" s_2 FROM "Sales Subject Area" ORDER BY 1, 2 ASC NULLS LAST ; ') -– Deletes specific logical SQL Cache
    Validate SQL and Retrieve Columns: This will validate the command issued  in previous step
    Click on results Tab, The message in RESULT_MESSAGE column indicates the success of cache deletion operation.
    Click on results Tab, The message in RESULT_MESSAGE column indicates the success of cache deletion operation.

    Deleting Cache using a script
    One can create a simple .txt file and specify the cache deletion command, which can be one or more of the following :
    Call SAPurgeAllCache()  -- Deletes all cache info
    Call SAPurgeCacheByTable( 'Datwarehouse',  '','DWH', 'XW_SALES_F');  -- deletes specific table cache
    Call SAPurgeCacheByDatabase( 'Datwarehouse' );   -- Deletes all cache related to a specific database
    Call SAPurgeCacheByQuery('SELECT   0 s_0,    "Sales Subject Area"."Time - Dimension"."MONTH_NAME" s_1, "Sales Subject Area"."Fact Sales"."COST_PRICE" s_2 FROM "Sales Subject Area" ORDER BY 1, 2 ASC NULLS LAST ; ') -– Deletes specific logical SQL Cache

    e.g. c:\del_cache.txt has the command Call SAPurgeAllCache() 
    This script can be run using the following command :
    D:\OBIEE11G\Oracle_BI1\bifoundation\server\bin\nqcmd –d coreapplication_OH833456789 –u admin –p weblogic –s c:\del_cache.txt
    -d : OBIEE Driver Name : Copu from windows DSN Names
    -u: Administrator user name
    -p: Administrator password
    -s: script path

    NQConfig.ini file parameters related to cache management

    Query Result Cache Section Parameters
    The parameters in the Query Result Cache Section provide configuration information for Oracle BI Server caching. The query cache is enabled by default. After deciding on a strategy for flushing outdated entries, you should configure the cache storage parameters in Fusion Middleware Control and in the NQSConfig.INI file.
    Note that query caching is primarily a run-time performance improvement capability. As the system is used over a period of time, performance tends to improve due to cache hits on previously executed queries. The most effective and pervasive way to optimize query performance is to use the Aggregate Persistence wizard and aggregate navigation.
    This section describes only the parameters that control query caching. For information about how to use caching in Oracle Business Intelligence, including information about how to use agents to seed the Oracle BI Server cache
    ENABLE
    Note:
    The ENABLE parameter is centrally managed by Fusion Middleware Control and cannot be changed by manually editing NQSConfig.INI, unless all configuration through Fusion Middleware Control has been disabled (not recommended).
    The Cache enabled option on the Performance tab of the Capacity Management page in Fusion Middleware Control corresponds to the ENABLE parameter.
     Specifies whether the cache system is enabled. When set to NO, caching is disabled. When set to YES, caching is enabled. The query cache is enabled by default.
    Example: ENABLE = YES;
    DATA_STORAGE_PATHS
    Specifies one or more paths for where the cached query results data is stored and are accessed when a cache hit occurs and the maximum capacity in bytes, kilobytes, megabytes, or gigabytes. The maximum capacity for each path is 4 GB. For optimal performance, the paths specified should be on high performance storage systems.
    Each path listed must be an existing, writable path name, with double quotation marks ( " ) surrounding the path name. Specify mapped directories only. UNC path names and network mapped drives are allowed only if the service runs under a qualified user account.
    You can specify either fully qualified paths, or relative paths. When you specify a path that does not start with "/" (on UNIX) or "<drive>:" (on Windows), the Oracle BI Server assumes that the path is relative to the local writable directory. For example, if you specify the path "cache," then at run time, the Oracle BI Server uses the following:
    ORACLE_INSTANCE/bifoundation/OracleBIServerComponent/coreapplication_obisn/cache
    Note:
    Multiple Oracle BI Servers across a cluster do not share cached data. Therefore, the DATA_STORAGE_PATHS entry must be unique for each clustered server. To ensure this unique entry, enter a relative path so that the cache is stored in the local writable directory for each Oracle BI Server, or enter different fully qualified paths for each server.
    Specify multiple directories with a comma-delimited list. When you specify multiple directories, they should reside on different physical drives. (If you have multiple cache directory paths that all resolve to the same physical disk, then both available and used space might be double-counted.)
    Syntax: DATA_STORAGE_PATHS = "path_1" sz[, "path_2" sz{, "path_n" sz}];
    Example: DATA_STORAGE_PATHS = "cache" 256 MB;
    Note:
    Specifying multiple directories for each drive does not improve performance, because file input and output (I/O) occurs through the same I/O controller. In general, specify only one directory for each disk drive. Specifying multiple directories on different drives might improve the overall I/O throughput of the Oracle BI Server internally by distributing I/O across multiple devices.
    The disk space requirement for the cached data depends on the number of queries that produce cached entries, and the size of the result sets for those queries. The query result set size is calculated as row size (or the sum of the maximum lengths of all columns in the result set) times the result set cardinality (that is, the number of rows in the result set). The expected maximum should be the guideline for the space needed.
    This calculation gives the high-end estimate, not the average size of all records in the cached result set. Therefore, if the size of a result set is dominated by variable length character strings, and if the length of those strings are distributed normally, you would expect the average record size to be about half the maximum record size.
    Note:
    It is a best practice to use a value that is less than 4 GB. Otherwise, the value might exceed the maximum allowable value for an unsigned 32-bit integer, because values over 4 GB cannot be processed on 32-bit systems. It is also a best practice to use values less than 4 GB on 64-bit systems.
    Create multiple paths if you have values in excess of 4 GB.
    MAX_ROWS_PER_CACHE_ENTRY
    Specifies the maximum number of rows in a query result set to qualify for storage in the query cache. Limiting the number of rows is a useful way to avoid consuming the cache space with runaway queries that return large numbers of rows. If the number of rows a query returns is greater than the value specified in the MAX_ROWS_PER_CACHE_ENTRY parameter, then the query is not cached.
    When set to 0, there is no limit to the number of rows per cache entry.
    Example: MAX_ROWS_PER_CACHE_ENTRY = 100000;
    MAX_CACHE_ENTRY_SIZE
    Note:
    The MAX_CACHE_ENTRY_SIZE parameter is centrally managed by Fusion Middleware Control and cannot be changed by manually editing NQSConfig.INI, unless all configuration through Fusion Middleware Control has been disabled (not recommended).
    The Maximum cache entry size option on the Performance tab of the Capacity Management page in Fusion Middleware Control corresponds to the MAX_CACHE_ENTRY_SIZE parameter.
    Specifies the maximum size for a cache entry. Potential entries that exceed this size are not cached. The default size is 20 MB.
    Specify GB for gigabytes, KB for kilobytes, MB for megabytes, and no units for bytes.
    Example: MAX_CACHE_ENTRY_SIZE = 20 MB;
    MAX_CACHE_ENTRIES
    Note:
    The MAX_CACHE_ENTRIES parameter is centrally managed by Fusion Middleware Control and cannot be changed by manually editing NQSConfig.INI, unless all configuration through Fusion Middleware Control has been disabled (not recommended).
    The Maximum cache entries option on the Performance tab of the Capacity Management page in Fusion Middleware Control corresponds to the MAX_CACHE_ENTRIES parameter.
    Specifies the maximum number of cache entries allowed in the query cache to help manage cache storage. The actual limit of cache entries might vary slightly depending on the number of concurrent queries. The default value is 1000.
    Example: MAX_CACHE_ENTRIES = 1000;
    POPULATE_AGGREGATE_ROLLUP_HITS
    Specifies whether to aggregate data from an earlier cached query result set and create a new entry in the query cache for rollup cache hits. The default value is NO.
    Typically, if a query gets a cache hit from a previously executed query, then the new query is not added to the cache. A user might have a cached result set that contains information at a particular level of detail (for example, sales revenue by ZIP code). A second query might ask for this same information, but at a higher level of detail (for example, sales revenue by state). The POPULATE_AGGREGATE_ROLLUP_HITS parameter overrides this default when the cache hit occurs by rolling up an aggregate from a previously executed query (in this example, by aggregating data from the first result set stored in the cache). That is, Oracle Business Intelligence sales revenue for all ZIP codes in a particular state can be added to obtain the sales revenue by state. This is referred to as a rollup cache hit.
    Normally, a new cache entry is not created for queries that result in cache hits. You can override this behavior specifically for cache rollup hits by setting POPULATE_AGGREGATE_ROLLUP_HITS to YES. Nonrollup cache hits are not affected by this parameter. If a query result is satisfied by the cache—that is, the query gets a cache hit—then this query is not added to the cache. When this parameter is set to YES, then when a query gets an aggregate rollup hit, then the result is put into the cache. Setting this parameter to YES might result in better performance, but results in more entries being added to the cache.
    Example: POPULATE_AGGREGATE_ROLLUP_HITS = NO;
    USE_ADVANCED_HIT_DETECTION
    When caching is enabled, each query is evaluated to determine whether it qualifies for a cache hit. A cache hit means that the server was able to use cache to answer the query and did not go to the database at all. The Oracle BI Server can use query cache to answer queries at the same or later level of aggregation.
    The parameter USE_ADVANCED_HIT_DETECTION enables an expanded search of the cache for hits. The expanded search has a performance impact, which is not easily quantified because of variable customer requirements. Customers that rely heavily on query caching and are experiencing misses might want to test the trade-off between better query matching and overall performance for high user loads. 
    MAX_SUBEXPR_SEARCH_DEPTH
    Lets you configure how deep the hit detector looks for an inexact match in an expression of a query. The default is 5.
    For example, at level 5, a query on the expression SIN(COS(TAN(ABS(ROUND(TRUNC(profit)))))) misses on profit, which is at level 7. Changing the search depth to 7 opens up profit for a potential hit.
    DISABLE_SUBREQUEST_CACHING
    When set to YES, disables caching at the subrequest (subquery) level. The default value is NO.
    Caching subrequests improves performance and the cache hit ratio, especially for queries that combine real-time and historical data. In some cases, however, you might disable subrequest caching, such as when other methods of query optimization provide better performance.
    Example: DISABLE_SUBREQUEST_CACHING = NO;
    GLOBAL_CACHE_STORAGE_PATH
    Note:
    The GLOBAL_CACHE_STORAGE_PATH parameter is centrally managed by Fusion Middleware Control and cannot be changed by manually editing NQSConfig.INI, unless all configuration through Fusion Middleware Control has been disabled (not recommended).
    The Global cache path and Global cache size options on the Performance tab of the Capacity Management page in Fusion Middleware Control correspond to the GLOBAL_CACHE_STORAGE_PATH parameter.
    In a clustered environment, Oracle BI Servers can be configured to access a shared cache that is referred to as the global cache. The global cache resides on a shared file system storage device and stores seeding and purging events and the result sets that are associated with the seeding events.
    This parameter specifies the physical location for storing cache entries shared across clustering. This path must point to a network share. All clustering nodes share the same location.
    You can specify the size in KB, MB, or GB, or enter a number with no suffix to specify bytes.
    Syntax: GLOBAL_CACHE_STORAGE_PATH = "directory name" SIZE;
    Example: GLOBAL_CACHE_STORAGE_PATH = "C:\cache" 250 MB;
    MAX_GLOBAL_CACHE_ENTRIES
    The maximum number of cache entries stored in the location that is specified by GLOBAL_CACHE_STORAGE_PATH.
    Example: MAX_GLOBAL_CACHE_ENTRIES = 1000;
    CACHE_POLL_SECONDS
    The interval in seconds that each node polls from the shared location that is specified in GLOBAL_CACHE_STORAGE_PATH.
    Example: CACHE_POLL_SECONDS = 300;
    CLUSTER_AWARE_CACHE_LOGGING
    Turns on logging for the cluster caching feature. Used only for troubleshooting. The default is NO.
    Example: CLUSTER_AWARE_CACHE_LOGGING = NO;
    "If you found this article useful, please rate the same"

    THanks
    Satya Ranki Reddy

    How to Create Users and Groups

    How to create Users and Groups in OBIEE11g


     Steps to Create a User and Group:

    If you want to create a new User and assign that User to a new Group that you have created, do the following:
    1. Launch Weblogic Administration Console eg: http:<hostname>:<port_no>/console
    2. Create a new User in security Realm.
    3. Create a new Group in security Realm.
    4. Add User to new Group.
    5. Launch Fusion Middleware EM console (http:<hostname>:<port_no>/em)and create a new Application Role and assign it to the new Group.
    6. Edit the repository (RPD file) and set up the privileges for the new Application.
    2. Create a new User in security Realm:
    Login Weblogic admin console and on Left side panel click on Security Realm1 . And click on myrealm2 in Right side panel.


    Click on Users and Groups Tab and below select Users tab again and then click New as shown in below screen shot.

    Create user by providing all details and click ok.


    3. Create a new Group in security Realm:
    Login Weblogic admin console and on Left side panel click on Security Realm1 . And click on myrealm2 in Right side panel.


    Click on Users and Groups Tab and below select Groups tab again and then click New as shown in below screen shot.


    Create a Group by providing all details and click ok.

    4. Add User to new Group.
    Click on Security ream->myrealm.
    And then click on Users and Groups and Users tab. In that click on new user (here User1 )

    In Next window click on Groups. In Available Groups select created group and Move to chosen window as shown below.


    5. Launch Fusion Middleware EM console (http:<hostname>:<port_no>/em)and create a new Application Role and assign it to the new Group:

    Assign Group to Application Role:

    Important:  Stop OPMN and Start again

    6. Edit the online repository (RPD file) and set up the privileges for the new Application:
    Click on Manage->Identity


    Click on BI Repository and on Right window clicking on Application Roles - Now you can see roles created in EM Console.


    To assign a group to an application role:


    1. Log in to Fusion Middleware Control, and display the Application Roles page.
      For information, Whether or not the obi application stripe is pre-selected and the application policies are displayed depends upon the method used to navigate to the Application Roles page.
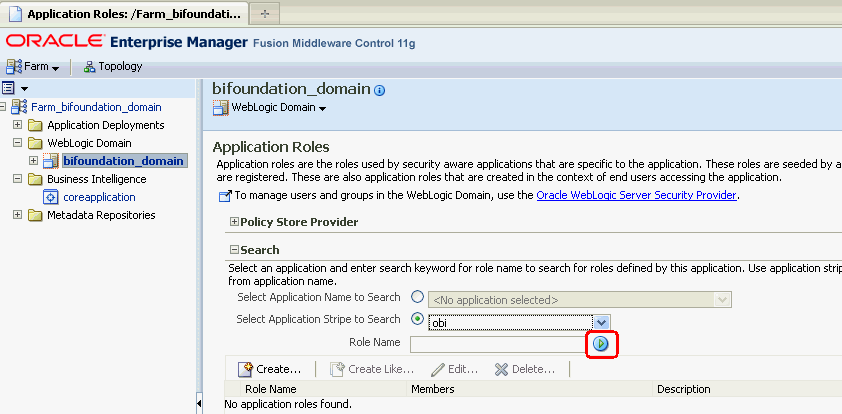
    2. If necessary, select Select Application Stripe to Search, then select obi from the list. Click the search icon next to Role Name. This screenshot or diagram is described in surrounding text.
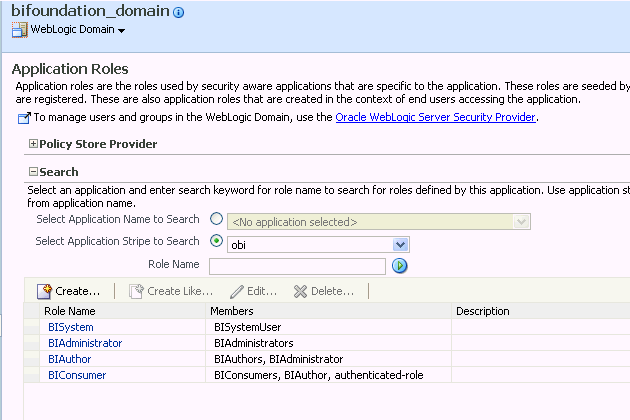
      The Oracle Business Intelligence application roles display. Figure 2-8shows the default application roles.

      Figure 2-8 The Default Application Roles
      This screenshot or diagram is described in surrounding text.
      Description of "Figure 2-8 The Default Application Roles"
    3. Select an application role in the list and click Edit to display an edit dialog, and complete the fields as follows:
    4. In the Members section, use the Add Group option to add the group that you want to assign to the Roles list.
      For example, if a group for marketing report consumers named BIMarketingGroup require an application role called BIConsumerMarketing, then add the group named BIMarketingGroup to Roles list.
    5. Click OK to return to the Application Roles page.


     How Application Roles, Groups and Users Work in OBIEE 11g


    By looking at the diagram below we can figure out that assigning Application Roles rather than permissions(read, write, execute) on the Dashboards and Reports.
    We cannot assign basic permissions(Read, Write and Execute) on Dashboard and Reports, since Dashboards and Reports consist of actions like scheduling, executing, viewing, editing, embedding etc.
    Hence the two level of granting accessing to users/groups and granting an Application Role to the user/group

    In OBIEE 11g we first create users and groups then copy an existing application role.
    First we put a user into a group then put the group into the newly copied application role.
    Here Application Roles already exist, mentioning the Application Policies(type of accesses given on various type of resources). Hence the copying of Application Roles rather than the creation of Application Roles.
    Lets observe how permissions are set on reports:
    1. Open the URL in a your web browser: http://localhost9704/analytics and login in as the Administrator i.e. weblogic user.
    2. Open the “Samples Sales Lite” , Catalog on the analytics menu then on the left “Folders” pane select “Shared Folders” -> “Sample Lite” -> “Published Reporting” -> “Analyses”.
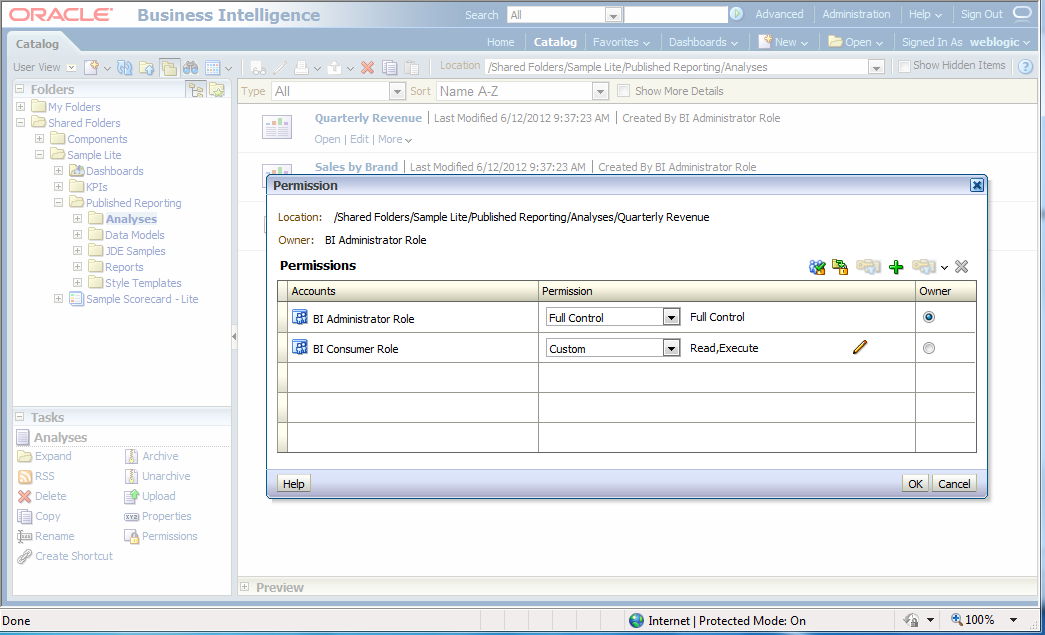
    3. On the right pane, select the “Quarterly Revenue” options, “More”, then “Permissions”.
    4. You can observe that “Bi Administrator Role” and “BI Consumer Role” roles have been allocated by default when a reports gets created by the Administrator “weblogic” user.
    5. Now lets go and observe what these “BI Administrator Role” and “BI Consumer Role” are composed of.
    6. Open the URL: http://localhost:7001/em and login with the “weblogic” user.
    7. Expand the “Farm_bifoundation_domain” then the “WebLogic Domain” and select “bifoundation_domain”.
    8. On the right pane select “WebLogic Domain” -> “Security” -> “Application Policies” as show in the below screenshot.
    9. Once the “Application Policies” window opens up on the right pane, in the “Search” Section select “obi” for the “Application Stripe” and “Application Role” for the “Principal Type”, then click on the blue button with yellow arrow .
    10. Select the “BIAdministrator” and click the “Edit…” link to show the “Edit Application Grant” page.
    11. As you can observe in the “Permissions” section it lists all the available resources allocated to this “BIAdministrator” Application Role.
    12. You can observe the same for the “BIAuthor” Application Role.
    13. On the right pane select “WebLogic Domain” -> “Security” -> “Application Roles”.
    14. Once the “Application Roles” window opens up on the right pane, in the “Search” Section select “obi” for the “Application Stripe”, then click on the blue button with yellow arrow .
    15. Select the “BIAdministrator” and click the “Edit…” link to show the “Edit Application Role : BIAdministrator” page.
    16. You can observe in the “Members” section that “BIAdministrators” group is included for this “BIAdministrator” Application Role.
    17. Now open the URL: http://localhost:7001/console and login as “weblogic” administrative user.
    18. On the “Domain Structure” Pane , select “Security Realms”.
    19. Under the “Summary of Security Realms” section in the right pane, select “myrealm”, then click on the “Users and Groups” Tab, then on the “Groups” tab.
    20. You can observe that a “BIAdministrators” group displayed in above screenshot is coming from here.
    21. You can also click on the “Users” tab and observe that the “weblogic” exists in the “BIAdministrators” group by clicking on the “weblogic” user and selecting the “groups” tab.
    22. This observation is which makes our initial user, group and application role relationship complete.
    Summary:
    We have now experienced how OBIEE 11g is handling our Authentication and Authorization to different resources. As a safety habit its better to use the “Create Like…” link and copy and create your “Application Roles” and “Application Policies” of working the default ones.
    In many cases you might unknowingly change the permissions or delete them which will effect proper functioning of the OBIEE’s default security policies.


    Thanks,
    Satya Ranki Reddy

    Tuesday, July 17, 2012

    OBIEE – Report Selection Prompt


    I was asked yesterday how to create View Selector type functionality that will allow the user to select between reports, rather than just views of the same report. I have a feeling this information must already be available, but I said that I’d provide instructions on how to achieve this and may as well add it to my blog.
    I will go through the steps with screenshots. We want to create 2 reports, Option 1 and Option 2; we need to create a third report that will return either true or false (results or no results). Both reports, Option 1 and Option 2 will be placed on the Dashboard, both in their own Sections; and both sections with Guided Navigation making use of the conditional request. We create a Dashboard prompt giving the options of Option 1 and Option 2; and add a filter to the conditional report so that it filters by the value selected in the prompt. Essentially if Option 1 is selected in the prompt then Report 1 will be displayed; and if Option 2 is selected then Report 2 will be displayed. Reading through this sounds very complex, but it isn’t really – if you haven’t understood then follow the steps below.
    Create the Dashboard Prompt
    The Dashboard Prompt will display a list of the Reports available; we can enter anything that we like for each option.  To achieve this we must use SQL to generate the Show Values.  OBI forces us to select an existing column to populate the prompt, but we get around this by using the expresssion CASE WHEN 1=2; the expression will never result to true and will always show the result of the else statement, our option.  We create a SQL statement for each option we would like in the Prompt and union the statements together (in the order that we would like them to appear).
    Note: The Column used should match the values you would like to generate
    Prompt Show SQL
    Prompt Show SQL
    For the SQL above, obviously change the references to “column”, “table” and “Business Model”.  Once happy with your SQL I would usually select the Preview Button to check my code.
    Test Prompt Show SQL
    Test Prompt Show SQL
    For this functionality you would usually not want an ‘All Choices’ option; uncheck its inclusion.  We should also choose to default to a Specific Value to restrict the list to only valid options.  Click on the elipses button and type your preferred default value from the last - no need for quotes, just the text itself.  I would usually verify that the default value is working by viewing the preview again.
    Updated Prompt
    Updated Prompt
    The only remaining task is to populate a Presentation Variable using the Set Presentation Variable Drop Down.  I have created a variable pVar_ViewOption.  You will also probably want to relabel the prompt to something more meaningful and then you can save it.
    Set Presentation Variable
    Set Presentation Variable
    Create a Conditional Report
    We need to create a conditional report; the report will filter by the presentation variable created.  We will design the report to return values when one Prompt option is selected and return no values otherwise.  Essentially the report will return true or false, based upon the option selected in the prompt.
    We need only a single column in the report; which should be the column referred to by the prompt.  Similar to the expression used in the prompt, we use a CASE statement to always return the relevant option; in this case the preffered option.
    Conditional Column Expression
    Conditional Column Expression
    We now add the filter to the conditional report to filter this column by the Presentation Variable.   If the option displayed by the column is selected then the report returns results; otherwise it returns no results.
    Conditional Filter
    Conditional Filter
    The Conditional Report is complete.  We also need to create the reports to be displayed with each option.  For this example I’ve created one for each of the 2 options.  So thats 3 reports in total and a prompt.  The screenshot below shows these object in My Folder.
    My Folder
    My Folder
    Configure the condition on a Dashboard
    Create a section for the prompt and another for each report.
    Dashboard Layout
    Dashboard Layout
    We need to use Guided Navigation on each of the Report Sections; we will only show each section based upon the results returned by the Conditional Request we have created.  The Guided Navigation setup for Report Option 1 is given below; notice that it returns a report on the condition the conditional report returns results (ie the prompt selection is our preferred option).
    Report Option 1 Guided Navigation
    Report Option 1 Guided Navigation
    Report 1 - Conditional Navigation
    Report 1 - Conditional Navigation
    We need to set Guided Navigation for the second report to show when our conditional report returns no results, as below.
    Report 2 - Conditional Navigation
    Report 2 - Conditional Navigation
    And thats the process complete.  When we save our Dashboard and view the page our prompt is shown and defaults to the preferred option; the guided navigation kicks in to display the first report and not the second.
    Test One
    Test One
    And then when we select the other option in our prompt the guided navigation kicks in to display only Report Option 2 section, and not our other Report Section.
    Report Two Test
    Report Two Test
    It is worth noting that behind the scenes all three reports will be ran by the BI Server. I wouldn’t be concerned unless the approach causes too much load on the server.  However, this approach should not be used to improve performance; it doesn’t work like that unfortunately.

    Thanks
    Satya Ranki Reddy