This task involves the following steps
- Create administrator alias in credentialstore.xml and update instanceconfig.xml
- Create BI Publisher groups in rpd and assign appropriate users to the groups.
- Setting up the Datasource to point to Oracle BI Server.
- Set up the Security Configuration to use Oracle BI Server Security Model
- Set up the Integration – Oracle BI Presentation Services
- Set up the Scheduler Configuration
1. Create alias in credentialstore.xml and update instanceconfig.xml
BI Publisher uses Impersonation to get authenticated with the BI Server. The first step towards it is to add an alias in credentialstore.xml.
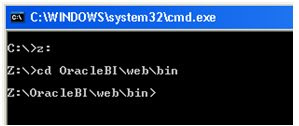
a. Open command prompt and browse to OracleBI/web/bin directory.
b. Enter command “cryptotools credstore –add”
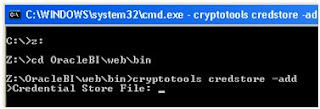
c. Enter the path of credentialstore.xml file. By default it is located in OracleBIData\web\config folder.
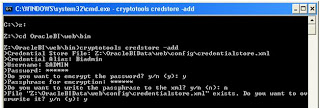
d. Enter a credential Alias which would be used in instanceconfig.xml
e. Enter Administrator’s Login ID and Password.
f. Once this is done enter the following lines in instanceconfig.xml
<advancedreporting>
<reportingengine>XmlP</reportingengine>
<volume>XmlP</volume>
<serverurl>http://localhost:9704/xmlpserver/services/XMLPService</serverurl>
<weburl>http://localhost:9704/xmlpserver</weburl>
<adminurl>http://localhost:9704/xmlpserver/servlet/admin</adminurl>
<admincredentialalias>Biadmin</admincredentialalias>
</advancedreporting>
<credentialstore><credentialstorage type="file" path="Z:\OracleBIData\web\config\credentialstore.xml"></credentialstore>
p.s. replace localhost with the servername on which oc4j is loaded.
g. Make sure the <AdminCredentialAlias> matches the one created in step d and the path of Credential Store is mentioned correctly.
h. Restart Oracle Presentation service.
2. Create BI Publisher groups in rpd and assign appropriate users to the groups
a. Create the following groups in rpd to correspond to BI Publisher functional roles
XMLP_ADMIN – this is the administrator role for the BI Publisher server.
XMLP_DEVELOPER – allows users to build reports in the system.
XMLP_SCHEDULER – allows users to schedule reports.
XMLP_ANALYZER_EXCEL – allows users to use the Excel analysis feature.
XMLP_ANALYZER_ONLINE – allows users to use the online analysis feature.
XMLP_TEMPLATE_DESIGNER - allows users to connect to the BI Publisher server from the Template Builder and to upload and download templates.
b. Assign users to appropriate groups. There should be at least one user in XMLP_ADMIN.
c. Restart Oracle BI Service.
3. Setting up the Datasource to point to Oracle BI Server
a. Login into the analytics application as an administrator.
b. Click on More Products -> BI Publisher
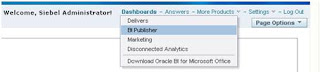
c. This should open up the BI Publisher Screen. Click on Admin tab. (If required login with the same credentials as that of Analytics).
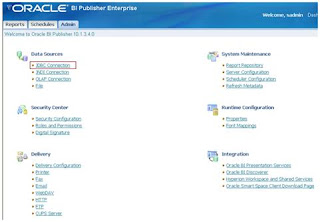
d. Click on JDBC Connection -> Add Data Source
e. Enter a name for the Data Source.
f. Select Driver Type as Oracle BI Server.
g. Confirm that the Database Driver Class is “oracle.bi.jdbc.AnaJdbcDriver”.
h. Enter the connection string as jdbc:oraclebi://<host>:<port> where host is the server on which Oracle BI server is installed. By default the port number is 9703.
i. Enter the Administrator credentials and Click on Test Connection

j. Confirm that the connection is successful and Click Apply.
4. Set up the Security Configuration to use Oracle BI Server Security Model
a. Click on Admin tab -> Security Configuration

b. Enable Super User and set User ID/ Password for it.
c. Select Oracle BI Server in Security Model.
d. In Connection String enter the same connection string as entered in 4-h.
e. Enter the User ID/ Password of rpd Administrator.In Database Driver Class enter oracle.bi.jdbc.AnaJdbcDriver
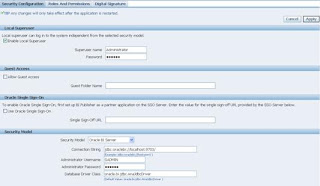
g. Click Apply.
h. Restart the oc4j server (restarting of xmlpserver from the applications tab of oc4j admin screen is also sufficient for changes to take place)
5. Set up the Integration – Oracle BI Presentation Services
a. Login into the analytics application as an administrator.
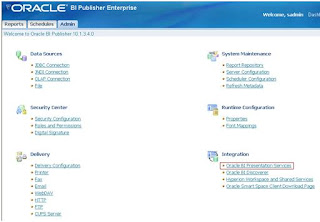
b. Click on More Products -> BI Publisher
c. This should open up the BI Publisher Screen. Click on Admin tab.
d. Click on Integration -> Oracle BI Presentation Services
e. Select server protocol as http
f. Server Version as v4
g. Server field should contain the server on which Oracle BI Presentation service is loaded.
h. Port should be 80 if analytics is using IIS or 9704 if analytics is using oc4j
i. Enter the rpd Administrator’s User ID / Password
j. URL suffix should be analytics/saw.dll
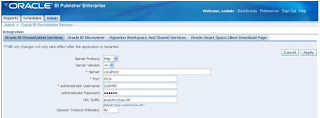
k. Click apply.
l. Restart the oc4j server (restarting of xmlpserver from the applications tab of oc4j admin screen is also sufficient for changes to take place).
6. Set up the Scheduler Configuration
a. Login into the analytics application as an administrator.
b. Click on More Products -> BI Publisher
c. This should open up the BI Publisher Screen. Click on Admin tab.
d. Click on System Maintenance -> Scheduler Configuration
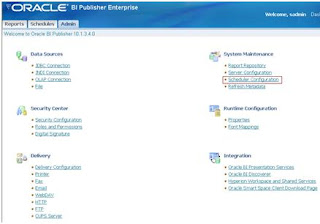
e. We need a database to use scheduler. This database will be used to store the information of various scheduler activities.
f. Select Database type
g. Connection String for Oracle and MSSQL is given below:
Oracle
- jdbc:oracle:thin:@<hostname>:<port>:<oracle SID>
eg. jdbc:oracle:thin:@oracleserver:1520:TEST
p.s. TEST is the SID, its alias in tnsnames should not be used here.
MS-SQL server
- jdbc:hyperion:sqlserver://<hostname>:<port>;DatabaseName=<DATABASENAME> eg. jdbc:hyperion:sqlserver://mssqlserver:1433;DatabaseName=INFA1
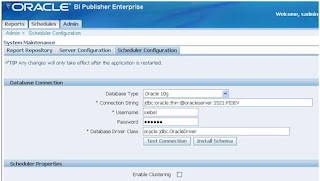
h. Click on Install Schema.
i. Click Apply and restart oc4j or xmlpserver.
j.
Important: If you stop and start or restart the database that contains your BI Publisher Scheduler tables, you must restart you BI Publisher Enterprise server.
(OR)
OBIEE - Configuring the publisher/scheduler for MySql
Publisher can be used to share and distribute reports. Scheduler is a quartz based scheduler for reporting jobs. In this post we will look at sending a report to a user via mail using the scheduler and publisher.
Steps
1. Login to BI publisher. If you face any problems during login, use the following troubleshooting options
http://forums.oracle.com/forums/thread.jspa?threadID=582633&start=0&tstart=60
http://oraclebizint.wordpress.com/2007/11/06/oracle-bi-publisher-and-bi-ee-invisible-admin-tab/
http://onlineappsdba.com/index.php/2009/01/15/oracle-bi-publisher-admin-console-xmlpserver-login-issue-administratoradministrator/
2. Note that the scheduler tab will be inactive.
3. To configure the scheduler. Open the Administration tool. Connect to the repository. Click on Manage->Jobs to launch the Job Manager.
4. In the job manager, Click on File -> configuration options.
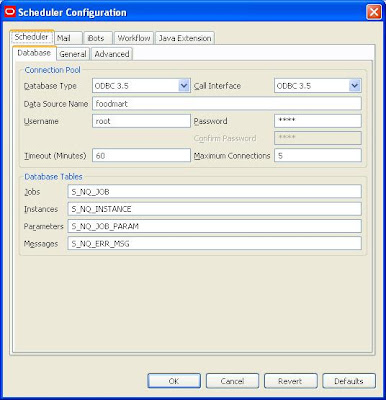
5. Click on the Scheduler tab on the tab.
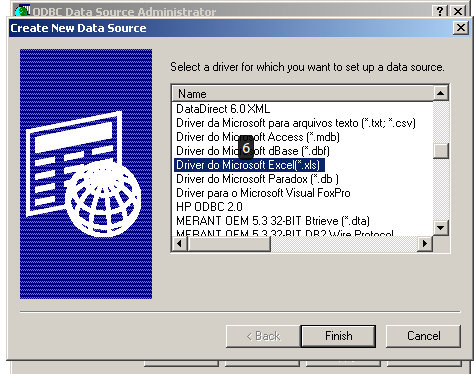
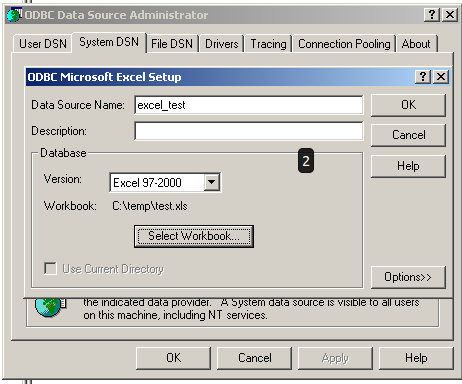
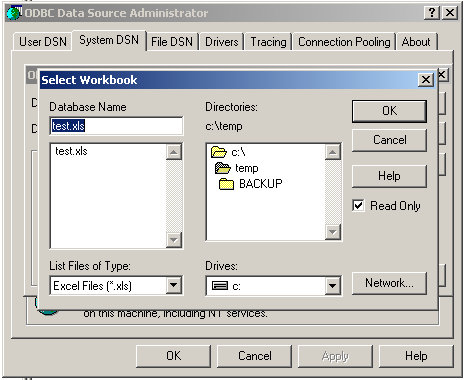
6. Click on the Database tab on the second row. Fill in the relevant information as shown in the screenshot. The DSN can be created as shown in earlier posts.
7. Click on the general tab on the second row and fill in the username and password. Check the scheduler script path and default script path (the default values should be ok).
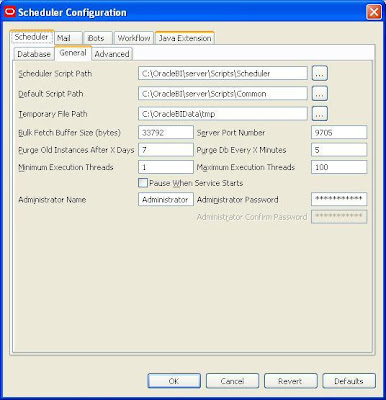
8. Click on OK to close the job manager dialog.
9. Open BI publisher. Click on the Admin tab (If admin tab is not visible look at the links posted in step 1).
10. In the datasources section of the admin tab click on the link that says 'JDBC connection'.
11. Click on the tab that says JDBC.
12. The default jdbc connections will be visible. We need to add the mysql connection to this list. This link explains how to do that
http://www.iwarelogic.com/blog/how-to-configure-mysql-database-connectivity-in-bi-publisher-485
13. Once that is done, go to the jdbc tab and create a new datasource for mysql.
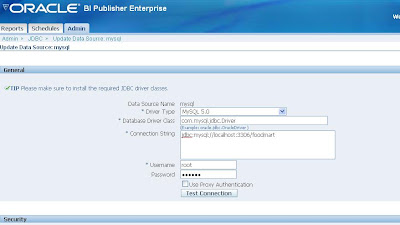
. The radio button that says 'user proxy authentication' should not be checked.
14. Next, click on the Admin tab in BI publisher and select that link that says 'Scheduler configuration' in System maintenance section. Click on the tab that says scheduler configuration. Fill in the mysql jdbc connection settings as shown.
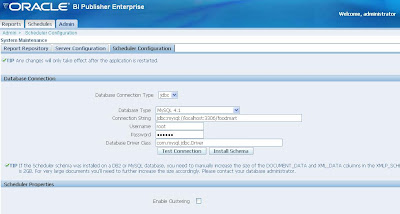
15. click on 'test connection'. Once the connection is successful. click on install schema. This will install the scheduler related schema in the foodmart database of mysql.
16. We need to create some more tables so that the scheduler service works. go to
/server/Schema location. There will be a file called SAJOBS.Oracle.sql Modify this file to suit Mysql and use this file to create tables in the foodmart schema of mysql.
17. we will now attempt to start the scheduler service. stop the BI server . start the scheduler service followed by the BI server (make sure mysql is running). It is important to start the scheduler service before BI server otherwise the schedule tab in BI publisher will not be enabled.
18. We will now create the report. Click on the Reports tab in BI publisher.
19. Click on create a new report. Once the report is created, open it in edit mode.
20. Add a data model to the report.
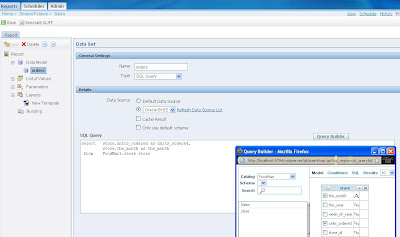
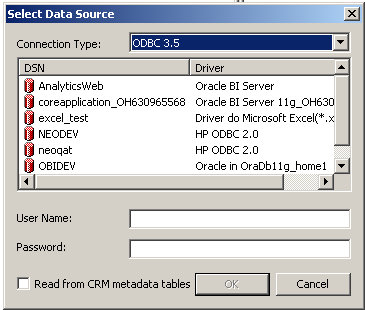
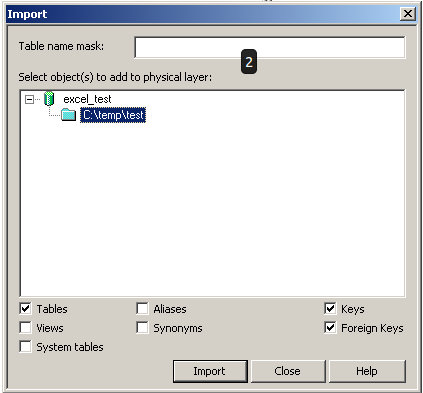
21. In the new data model page, select SQL query as the Type. User oracle BI EE as the datasource. click on query builder to build the report query.
 22. click on layout and create a new layout based on default data model.
23. save the report. click on view. the report should be visible.
24. To schedule the report, click on schedule when the report is in view or edit mode.
25. Fill in the relavant details. Use E-mail as notification channel. enter the destination e-mail address in e-mail delivery.
26. Before scheduling the report, however, the e-mail options need to be set in BI publisher. To do so, click on the admin tab and click the link that says Email in the delivery section. Click on Add server and add the connection info for the smtp server that will be used for sending the mail.
27. once scheduling is complete, look at the schedules tab for a list of jobs that have been scheduled.
22. click on layout and create a new layout based on default data model.
23. save the report. click on view. the report should be visible.
24. To schedule the report, click on schedule when the report is in view or edit mode.
25. Fill in the relavant details. Use E-mail as notification channel. enter the destination e-mail address in e-mail delivery.
26. Before scheduling the report, however, the e-mail options need to be set in BI publisher. To do so, click on the admin tab and click the link that says Email in the delivery section. Click on Add server and add the connection info for the smtp server that will be used for sending the mail.
27. once scheduling is complete, look at the schedules tab for a list of jobs that have been scheduled.
Thanks,
Satya Ranki Reddy


