How to create Users and Groups in OBIEE11g
Steps to Create a User and Group:
If you want to create a new User and assign that User to a new Group that you have created, do the following:
Login Weblogic admin console and on Left side panel click on Security Realm1 . And click on myrealm2 in Right side panel.

Click on Users and Groups Tab and below select Users tab again and then click New as shown in below screen shot.

Create user by providing all details and click ok.

3. Create a new Group in security Realm:
Login Weblogic admin console and on Left side panel click on Security Realm1 . And click on myrealm2 in Right side panel.

Click on Users and Groups Tab and below select Groups tab again and then click New as shown in below screen shot.

Create a Group by providing all details and click ok.

4. Add User to new Group.
Click on Security ream->myrealm.
And then click on Users and Groups and Users tab. In that click on new user (here User1 )

In Next window click on Groups. In Available Groups select created group and Move to chosen window as shown below.

5. Launch Fusion Middleware EM console (http:<hostname>:<port_no>/em)and create a new Application Role and assign it to the new Group:

Assign Group to Application Role:

Important: Stop OPMN and Start again
6. Edit the online repository (RPD file) and set up the privileges for the new Application:
Click on Manage->Identity

Click on BI Repository and on Right window clicking on Application Roles - Now you can see roles created in EM Console.

- Launch Weblogic Administration Console eg: http:<hostname>:<port_no>/console
- Create a new User in security Realm.
- Create a new Group in security Realm.
- Add User to new Group.
- Launch Fusion Middleware EM console (http:<hostname>:<port_no>/em)and create a new Application Role and assign it to the new Group.
- Edit the repository (RPD file) and set up the privileges for the new Application.
Login Weblogic admin console and on Left side panel click on Security Realm1 . And click on myrealm2 in Right side panel.

Click on Users and Groups Tab and below select Users tab again and then click New as shown in below screen shot.

Create user by providing all details and click ok.

3. Create a new Group in security Realm:
Login Weblogic admin console and on Left side panel click on Security Realm1 . And click on myrealm2 in Right side panel.

Click on Users and Groups Tab and below select Groups tab again and then click New as shown in below screen shot.

Create a Group by providing all details and click ok.

4. Add User to new Group.
Click on Security ream->myrealm.
And then click on Users and Groups and Users tab. In that click on new user (here User1 )

In Next window click on Groups. In Available Groups select created group and Move to chosen window as shown below.

5. Launch Fusion Middleware EM console (http:<hostname>:<port_no>/em)and create a new Application Role and assign it to the new Group:

Assign Group to Application Role:

Important: Stop OPMN and Start again
6. Edit the online repository (RPD file) and set up the privileges for the new Application:
Click on Manage->Identity

Click on BI Repository and on Right window clicking on Application Roles - Now you can see roles created in EM Console.

To assign a group to an application role:
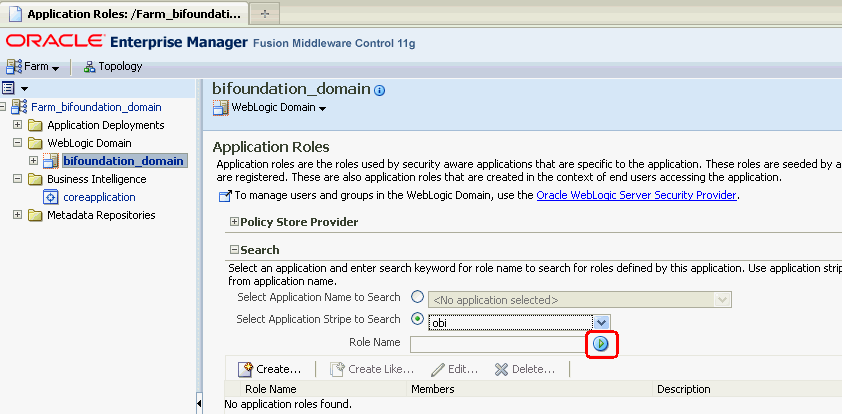
- Log in to Fusion Middleware Control, and display the Application Roles page.
For information, Whether or not the obi application stripe is pre-selected and the application policies are displayed depends upon the method used to navigate to the Application Roles page. - If necessary, select Select Application Stripe to Search, then select obi from the list. Click the search icon next to Role Name.

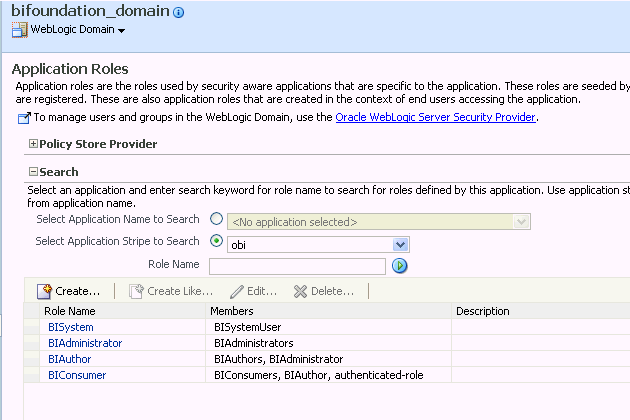
The Oracle Business Intelligence application roles display. Figure 2-8shows the default application roles.
- Select an application role in the list and click Edit to display an edit dialog, and complete the fields as follows:
- In the Members section, use the Add Group option to add the group that you want to assign to the Roles list.
For example, if a group for marketing report consumers named BIMarketingGroup require an application role called BIConsumerMarketing, then add the group named BIMarketingGroup to Roles list. - Click OK to return to the Application Roles page.
How Application Roles, Groups and Users Work in OBIEE 11g
By looking at the diagram below we can figure out that assigning Application Roles rather than permissions(read, write, execute) on the Dashboards and Reports.
We cannot assign basic permissions(Read, Write and Execute) on Dashboard and Reports, since Dashboards and Reports consist of actions like scheduling, executing, viewing, editing, embedding etc.
Hence the two level of granting accessing to users/groups and granting an Application Role to the user/group

In OBIEE 11g we first create users and groups then copy an existing application role.
First we put a user into a group then put the group into the newly copied application role.
Here Application Roles already exist, mentioning the Application Policies(type of accesses given on various type of resources). Hence the copying of Application Roles rather than the creation of Application Roles.
Lets observe how permissions are set on reports:
We have now experienced how OBIEE 11g is handling our Authentication and Authorization to different resources. As a safety habit its better to use the “Create Like…” link and copy and create your “Application Roles” and “Application Policies” of working the default ones.
In many cases you might unknowingly change the permissions or delete them which will effect proper functioning of the OBIEE’s default security policies.
We cannot assign basic permissions(Read, Write and Execute) on Dashboard and Reports, since Dashboards and Reports consist of actions like scheduling, executing, viewing, editing, embedding etc.
Hence the two level of granting accessing to users/groups and granting an Application Role to the user/group

In OBIEE 11g we first create users and groups then copy an existing application role.
First we put a user into a group then put the group into the newly copied application role.
Here Application Roles already exist, mentioning the Application Policies(type of accesses given on various type of resources). Hence the copying of Application Roles rather than the creation of Application Roles.
Lets observe how permissions are set on reports:
- Open the URL in a your web browser: http://localhost9704/analytics and login in as the Administrator i.e. weblogic user.
- Open the “Samples Sales Lite” , Catalog on the analytics menu then on the left “Folders” pane select “Shared Folders” -> “Sample Lite” -> “Published Reporting” -> “Analyses”.
- On the right pane, select the “Quarterly Revenue” options, “More”, then “Permissions”.
- You can observe that “Bi Administrator Role” and “BI Consumer Role” roles have been allocated by default when a reports gets created by the Administrator “weblogic” user.

- Now lets go and observe what these “BI Administrator Role” and “BI Consumer Role” are composed of.
- Open the URL: http://localhost:7001/em and login with the “weblogic” user.
- Expand the “Farm_bifoundation_domain” then the “WebLogic Domain” and select “bifoundation_domain”.
- On the right pane select “WebLogic Domain” -> “Security” -> “Application Policies” as show in the below screenshot.

- Once the “Application Policies” window opens up on the right pane, in the “Search” Section select “obi” for the “Application Stripe” and “Application Role” for the “Principal Type”, then click on the blue button with yellow arrow
 .
. - Select the “BIAdministrator” and click the “Edit…” link to show the “Edit Application Grant” page.
- As you can observe in the “Permissions” section it lists all the available resources allocated to this “BIAdministrator” Application Role.
- You can observe the same for the “BIAuthor” Application Role.

- On the right pane select “WebLogic Domain” -> “Security” -> “Application Roles”.
- Once the “Application Roles” window opens up on the right pane, in the “Search” Section select “obi” for the “Application Stripe”, then click on the blue button with yellow arrow
 .
. - Select the “BIAdministrator” and click the “Edit…” link to show the “Edit Application Role : BIAdministrator” page.
- You can observe in the “Members” section that “BIAdministrators” group is included for this “BIAdministrator” Application Role.

- Now open the URL: http://localhost:7001/console and login as “weblogic” administrative user.
- On the “Domain Structure” Pane , select “Security Realms”.
- Under the “Summary of Security Realms” section in the right pane, select “myrealm”, then click on the “Users and Groups” Tab, then on the “Groups” tab.
- You can observe that a “BIAdministrators” group displayed in above screenshot is coming from here.

- You can also click on the “Users” tab and observe that the “weblogic” exists in the “BIAdministrators” group by clicking on the “weblogic” user and selecting the “groups” tab.
- This observation is which makes our initial user, group and application role relationship complete.
We have now experienced how OBIEE 11g is handling our Authentication and Authorization to different resources. As a safety habit its better to use the “Create Like…” link and copy and create your “Application Roles” and “Application Policies” of working the default ones.
In many cases you might unknowingly change the permissions or delete them which will effect proper functioning of the OBIEE’s default security policies.
Thanks,
Satya Ranki Reddy


No comments:
Post a Comment