Oracle BI EE 10.1.3.3 – Configuring Delivers – iBots
I had one OBI EE user today who had specifically asked about configuring iBots. Though it is pretty straight forward, the customer was looking out for a screenshot by screenshot tutorial on how to go about setting delivers. Well, i had some time to put this one together. Hopefully, you would find it of some use.
1. The first step is to configure a schema that would hold all our scheduler tables. If you do not have a schema create or use an existing one. In my case i have a schema called S_NQ_SCHED wherein i would create all my scheduler tables.
2. Navigate to your {ORACLEBI}/Server/Schema folder and run the scheduler scripts. If you are on an Oracle Database, you would have to run SAJOBS.Oracle.sql. This would basically create the scheduler tables that Oracle Delivers would use later.
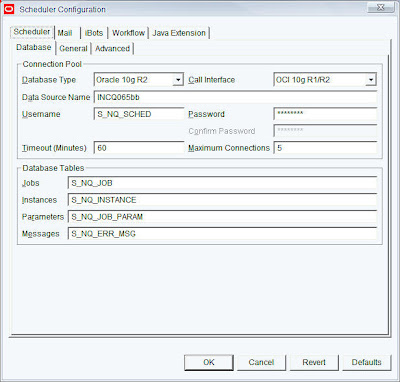
3. The next step is to open your Job Manager. Go to File – > Configuration Options and enter the schema and connection details for the scheduler schema. In my case it would be S_NQ_SCHED schema.

4. Go to the General tab. If you had followed the default install, then leave everything the same. Just enter in the Administrator usernames and passwords.

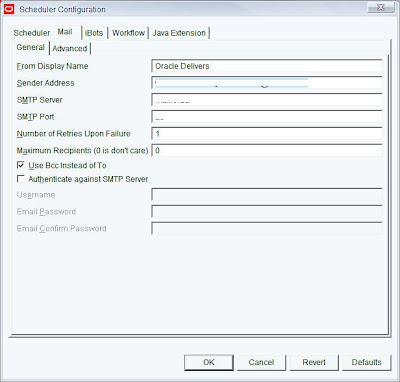
5. Go to the Mail tab and enter in your mail server details.

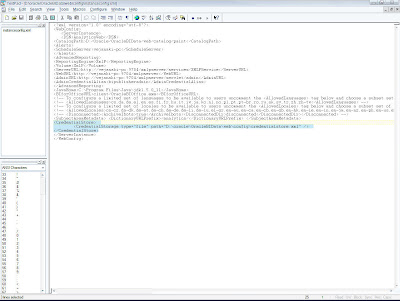
6. Open your instanceconfig.xml and add in the scheduler details. This step basically lets the presentation server know about the machine and port details of the scheduler. By default the scheduler port is 9705.

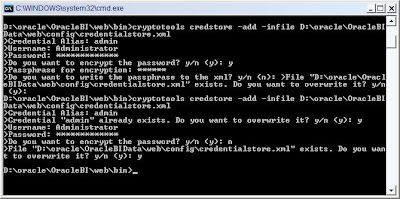
7. The next step is to run a cryptotools utility that would basically store the username and password of the scheduler into an XML file called credentialstore.xml.
8. Go to {OracleBI}/web/bin from command prompt. Then enter in the following command.
cryptotools credstore -add -infile OracleBIData_HOME/web/config/credentialstore.xml

Ensure that you have the alias as “Admin”.
9. The next step is to add the details of this credentialstore.xml file into the instanceconfig.xml.

Once this is done you should be able to schedule and create new ibots. The best and quick way to check whether the configuration has been done properly is to save a sample ibot. If you are able to properly save one then your configuration has been properly set. For more details refer the docs here.
OBIEE Configuring the scheduler on Windows2003/Oracle
1. The first step is to configure a schema that would hold all our scheduler tables. If you do not have a schema create or use an existing one. In my case i have a schema called S_NQ_SCHED wherein i would create all my scheduler tables.
2. Navigate to your {ORACLEBI}/Server/Schema folder and run the scheduler scripts. If you are on an Oracle Database, you would have to run SAJOBS.Oracle.sql. This would basically create the scheduler tables that Oracle Delivers would use later.
3. The next step is to open your Job Manager. Go to File – > Configuration Options and enter the schema and connection details for the scheduler schema. In my case it would be S_NQ_SCHED schema.

4. Go to the General tab. If you had followed the default install, then leave everything the same. Just enter in the Administrator usernames and passwords.

5. Go to the Mail tab and enter in your mail server details.

6. Open your instanceconfig.xml and add in the scheduler details. This step basically lets the presentation server know about the machine and port details of the scheduler. By default the scheduler port is 9705.

7. The next step is to run a cryptotools utility that would basically store the username and password of the scheduler into an XML file called credentialstore.xml.
8. Go to {OracleBI}/web/bin from command prompt. Then enter in the following command.
cryptotools credstore -add -infile OracleBIData_HOME/web/config/credentialstore.xml

Ensure that you have the alias as “Admin”.
9. The next step is to add the details of this credentialstore.xml file into the instanceconfig.xml.

Once this is done you should be able to schedule and create new ibots. The best and quick way to check whether the configuration has been done properly is to save a sample ibot. If you are able to properly save one then your configuration has been properly set. For more details refer the docs here.
OBIEE Configuring the scheduler on Windows2003/Oracle
As with many configurations on OBIEE, it’s in the documentation only distributed on many PDF’s. Here is how install the OBIEE scheduler on Windows2003 and an Oracle DB. Basiicly you have to go trough 5 steps:
1. Create the DB User and Tables
2. Check the instanceconfig.
3. Add the Scheduler Administrator to the credential store
4. Configure the Job Manager
5. Run A test
1. Create the DB User and Tables.
The table scripts can be found in ..\OracleBI\server\Schema\SAJOBS.Oracle.sql, but you have create the user yourself. Or you can use this script:
/*****************************************************************************/
/* Setup OBIEE scheduler on ORACLE */
/* READ THE SCRIPT BEFORE YOU RUN IT !!!!!!!!!! */
/* Run the script as SYSTEM */
/*****************************************************************************/
/*****************************************************************************/
/* Create the S_NQ_SCHED user */
/* You can change the password NOT the user name */
/*****************************************************************************/
DROP USER S_NQ_SCHED;
CREATE USER S_NQ_SCHED IDENTIFIED BY "S_NQ_SCHED_PASSWORD"
DEFAULT TABLESPACE "USERS"
TEMPORARY TABLESPACE "TEMP"
PROFILE DEFAULT
QUOTA UNLIMITED ON "USERS";
GRANT "CONNECT" TO S_NQ_SCHED;
GRANT "RESOURCE" TO S_NQ_SCHED;
GRANT CREATE SESSION TO S_NQ_SCHED;
GRANT CREATE TABLE TO S_NQ_SCHED;
GRANT CREATE VIEW TO S_NQ_SCHED;
ALTER USER S_NQ_SCHED DEFAULT ROLE NONE;
2. Check the instanceconfig.xml
In ..\OracleBIData\web\config you will find the instanceConfig.xml

Check if the entry between Alerts Tags has a ScheduleServer entry. If you run it on an other port then 9705 add it in the form ServerName:PortNumber (MyServer:1234).
3. Add the Scheduler Administrator to the credential store
Open a commend line box:
cryptotools credstore -add -infile e:/OracleBIData/web/config/credentialstore.xml
Credential Alias: admin
Username: SchedulerAdmin
Password: SchedulerAdmin Do you want to encrypt the password? y/n (y): Y
Passphrase for encryption: secret
Do you want to write the passphrase to the xml? y/n (n): Y
File "OracleBIData_HOME/web/config/credentialstore.xml" exists. Do you want to
overwrite it? y/n (y): Y

4. Configure the Job Manager

From the file menu select Configuration Options

On the Database tab enter the connection pool data. Always use the native call interface if possible!.

On the General tab enter the adminstartor name and credebntials
Start the scheduler service

You can find the log in: ..\OracleBI\server\Log
5. Run A test
Create a simple report and press Save And Schedule

Click on the destinations tab an select Oracle BI Server Cache

Save the IBot.
Open a connection with the jobmanager:

Enter the login credentials

Press the refresh button:

Have a look at the entry:

Thanks,
Satya Ranki Reddy
1. Create the DB User and Tables
2. Check the instanceconfig.
3. Add the Scheduler Administrator to the credential store
4. Configure the Job Manager
5. Run A test
1. Create the DB User and Tables.
The table scripts can be found in ..\OracleBI\server\Schema\SAJOBS.Oracle.sql, but you have create the user yourself. Or you can use this script:
/*****************************************************************************/
/* Setup OBIEE scheduler on ORACLE */
/* READ THE SCRIPT BEFORE YOU RUN IT !!!!!!!!!! */
/* Run the script as SYSTEM */
/*****************************************************************************/
/*****************************************************************************/
/* Create the S_NQ_SCHED user */
/* You can change the password NOT the user name */
/*****************************************************************************/
DROP USER S_NQ_SCHED;
CREATE USER S_NQ_SCHED IDENTIFIED BY "S_NQ_SCHED_PASSWORD"
DEFAULT TABLESPACE "USERS"
TEMPORARY TABLESPACE "TEMP"
PROFILE DEFAULT
QUOTA UNLIMITED ON "USERS";
GRANT "CONNECT" TO S_NQ_SCHED;
GRANT "RESOURCE" TO S_NQ_SCHED;
GRANT CREATE SESSION TO S_NQ_SCHED;
GRANT CREATE TABLE TO S_NQ_SCHED;
GRANT CREATE VIEW TO S_NQ_SCHED;
ALTER USER S_NQ_SCHED DEFAULT ROLE NONE;
2. Check the instanceconfig.xml
In ..\OracleBIData\web\config you will find the instanceConfig.xml

Check if the entry between Alerts Tags has a ScheduleServer entry. If you run it on an other port then 9705 add it in the form ServerName:PortNumber (MyServer:1234).
3. Add the Scheduler Administrator to the credential store
Open a commend line box:
cryptotools credstore -add -infile e:/OracleBIData/web/config/credentialstore.xml
Credential Alias: admin
Username: SchedulerAdmin
Password: SchedulerAdmin Do you want to encrypt the password? y/n (y): Y
Passphrase for encryption: secret
Do you want to write the passphrase to the xml? y/n (n): Y
File "OracleBIData_HOME/web/config/credentialstore.xml" exists. Do you want to
overwrite it? y/n (y): Y

4. Configure the Job Manager

From the file menu select Configuration Options

On the Database tab enter the connection pool data. Always use the native call interface if possible!.

On the General tab enter the adminstartor name and credebntials
Start the scheduler service

You can find the log in: ..\OracleBI\server\Log
5. Run A test
Create a simple report and press Save And Schedule

Click on the destinations tab an select Oracle BI Server Cache

Save the IBot.
Open a connection with the jobmanager:

Enter the login credentials

Press the refresh button:

Have a look at the entry:

Thanks,
Satya Ranki Reddy

No comments:
Post a Comment