
Increase the Slider Limit in OBIEE 11.1.5
If you try to increase the slider count > 50 then you will get the following error . Because by default limit is <=50 .

To increase the limit modify the instanceconfig file:
<OBIEE Home>\instances\instance1\config\OracleBIPresentationServicesComponent\coreapplication_obips1\instanceconfig.xml
Locate <Views></Views> tag and inbetween enter the following XML, for example, to increase the limit to 500 values:
<Charts>
<SectionSliderDefault>5</SectionSliderDefault>
<SectionSliderLimit>500</SectionSliderLimit>
</Charts>
instanceconfig.xml file should be as follows .

Restart BI services and try the slider again.

To increase the limit modify the instanceconfig file:
<OBIEE Home>\instances\instance1\config\OracleBIPresentationServicesComponent\coreapplication_obips1\instanceconfig.xml
Locate <Views></Views> tag and inbetween enter the following XML, for example, to increase the limit to 500 values:
<Charts>
<SectionSliderDefault>5</SectionSliderDefault>
<SectionSliderLimit>500</SectionSliderLimit>
</Charts>
instanceconfig.xml file should be as follows .

Restart BI services and try the slider again.
Google Maps Based Background Maps in OBIEE11G(11.1.1.5.0 )
Map view is a new view in OBIEE11g that permit to include a mapviewer map in an answer. When you edit a map view and work with layers, you create formats for those layers.
Observations:
Oracle MapViewer now supports Google Maps as a built-in tile layer. Which means you can use MapViewer to create a tile layer with tile imagery served from the Google Maps server. Once created, you can use these map tiles in your map views in Oracle BI as background maps, without the need to do any programming or custom work.
Lets follow the steps below :
Download the sample OBIEE Data and Repository (Rpd Password: prasad123) that I used in this blog . (The table that I used contains 142,350 rows )
)
step3: Click on Datasources .

Step4: Enter the database details that we did in Step1 .
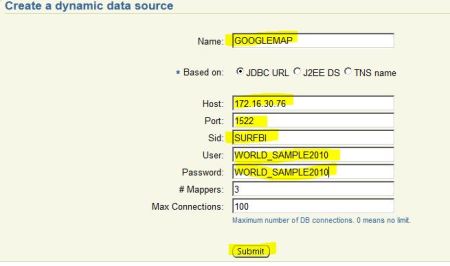
Make sure that the Data Source created successfully . The screen should be as follows .

Step5: Click on ‘Manage Map Tile Layers ‘ –> ‘Create’–> select ‘Google Maps’ and click on Continue .

You will see the screen as follows .

Step6 : Here we have to enter Google Maps API Key for this click here and login into your google acount it will generate the key .

Step7 : Take the Generated Key .

Go back to Step5 and Enter this key .
In my case the entry is as follows .
lib_url : http://maps.google.com/maps?file=api&v=2&sensor=false&key=$ABQIAAAAOZl5mXAl3lnQaAmpiv0kZBRVG7RGNkkKa3S3wcJho1Uz7mlwSxSsyhpWsQk_o-8HHZ6U8UoR7JPtbQ$
key : ABQIAAAAOZl5mXAl3lnQaAmpiv0kZBRVG7RGNkkKa3S3wcJho1Uz7mlwSxSsyhpWsQk

Click on ‘submit’ on the same screen.

The Google map is created now . The screen looks as follows . Click on ‘Bring Online’ so that the Map will be available to use in OBIEE Answers.

To make sure that the map is created properly or not ,click on ‘View Maps/ Manage Tiles’ and screen should be looks as follows .

Step9: Click on Administration –> Manage Map Data –> Layers –> Import Layers
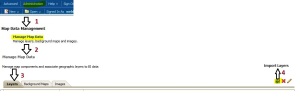
Step10: Import all the layers .

The screen should looks like this

Step11: Select M_STATE_ABRV and click on Edit Layers .

Click on and Select Maps Subject Area

and select STATTE_ABRV Column
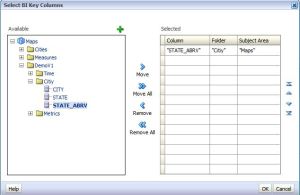 and click OK .
Step12 :Click on Background Maps –> Import Background Maps and select Google Map and click OK.
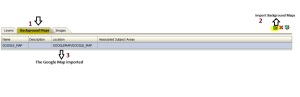
Click On Edit Background Map and click on to set zoom levels associated with BI Data can display .
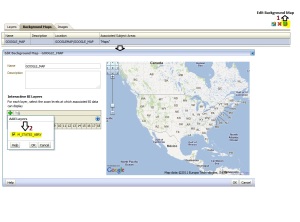
Set the zoom leves looks as following screen . The data available in BI will be highlighted in map .

Click Ok .
Step13: Click on images to import all the required images for Google Maps .
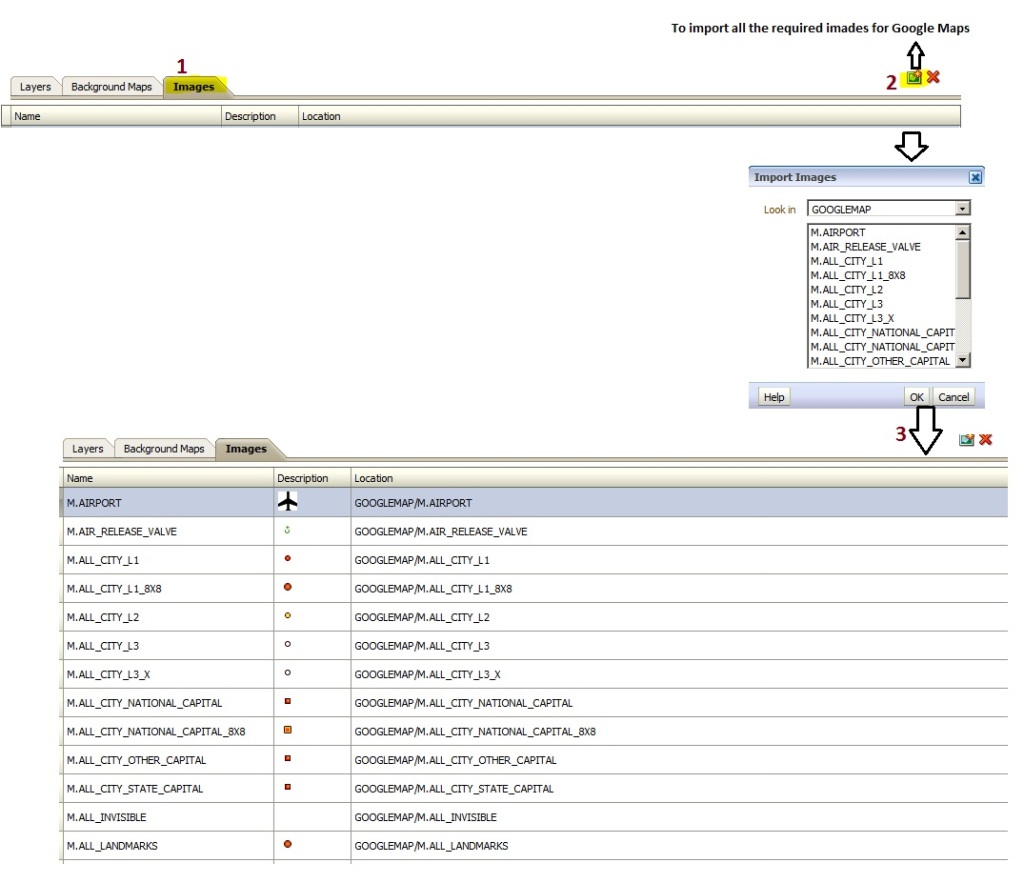
Click OK .
We are done with Map Administration .Next Step is to Create Map View in Answers .
Step14 : Create New –> Analysis and select the subject area Maps .
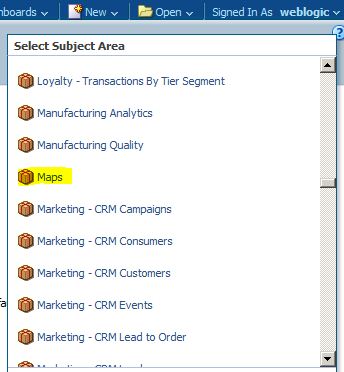
Pull the columns STATE_ABRV,YEAR,Actual Revenue,Target Revenue .

Click on Results, by default you can see the table view . Here goto New View and select Map View .

Step15 : Select GOOGLE_MAP from menu .

Step:16: The map appears as follows .
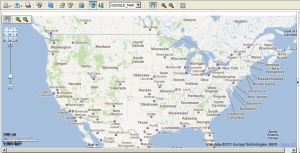
Click on New –> ‘Color Fill’ on the map View .
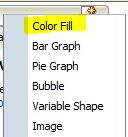
and select ‘STATE_ABRV’ .

Select required color from the window and check the checkbox ‘Allow Dashboard users to edit Thresholds ‘.
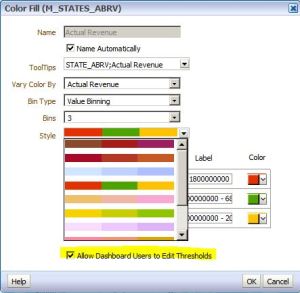
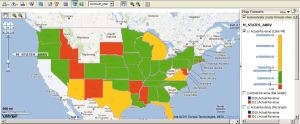
The Map should be looks like below screen.
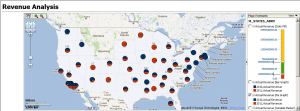
||y you can create Bar Graphs,Pie,Variable Markers..
find the below screen shots .



Master Detail can support from Map view .

Satya Ranki Reddy
Observations:
- A map view can be a Master, but never the Detail.
- Map views do not support hierarchical columns.
- Can pass parameters from Prompt .
- Can Pass Master Detail Event .
Oracle MapViewer now supports Google Maps as a built-in tile layer. Which means you can use MapViewer to create a tile layer with tile imagery served from the Google Maps server. Once created, you can use these map tiles in your map views in Oracle BI as background maps, without the need to do any programming or custom work.
Lets follow the steps below :
- Required Work in Oracle Database :
Download the sample OBIEE Data and Repository (Rpd Password: prasad123) that I used in this blog . (The table that I used contains 142,350 rows
)- Required Work in Oracle Mapviewer:

step3: Click on Datasources .

Step4: Enter the database details that we did in Step1 .

Make sure that the Data Source created successfully . The screen should be as follows .

Step5: Click on ‘Manage Map Tile Layers ‘ –> ‘Create’–> select ‘Google Maps’ and click on Continue .

You will see the screen as follows .

Step6 : Here we have to enter Google Maps API Key for this click here and login into your google acount it will generate the key .

Step7 : Take the Generated Key .

Go back to Step5 and Enter this key .
In my case the entry is as follows .
lib_url : http://maps.google.com/maps?file=api&v=2&sensor=false&key=$ABQIAAAAOZl5mXAl3lnQaAmpiv0kZBRVG7RGNkkKa3S3wcJho1Uz7mlwSxSsyhpWsQk_o-8HHZ6U8UoR7JPtbQ$
key : ABQIAAAAOZl5mXAl3lnQaAmpiv0kZBRVG7RGNkkKa3S3wcJho1Uz7mlwSxSsyhpWsQk

Click on ‘submit’ on the same screen.

The Google map is created now . The screen looks as follows . Click on ‘Bring Online’ so that the Map will be available to use in OBIEE Answers.

To make sure that the map is created properly or not ,click on ‘View Maps/ Manage Tiles’ and screen should be looks as follows .

- Required Work in OBIEE 11G :

Step9: Click on Administration –> Manage Map Data –> Layers –> Import Layers

Step10: Import all the layers .

The screen should looks like this

Step11: Select M_STATE_ABRV and click on Edit Layers .

Click on
 and Select Maps Subject Area
and select STATTE_ABRV Column
 and click OK .
Step12 :Click on Background Maps –> Import Background Maps and select Google Map and click OK.

Click On Edit Background Map and click on
 to set zoom levels associated with BI Data can display .
Set the zoom leves looks as following screen . The data available in BI will be highlighted in map .

Click Ok .
Step13: Click on images to import all the required images for Google Maps .

Click OK .
We are done with Map Administration .Next Step is to Create Map View in Answers .
Step14 : Create New –> Analysis and select the subject area Maps .

Pull the columns STATE_ABRV,YEAR,Actual Revenue,Target Revenue .

Click on Results, by default you can see the table view . Here goto New View and select Map View .

Step15 : Select GOOGLE_MAP from menu .

Step:16: The map appears as follows .

Click on New –> ‘Color Fill’ on the map View .

and select ‘STATE_ABRV’ .

Select required color from the window and check the checkbox ‘Allow Dashboard users to edit Thresholds ‘.

The Map should be looks like below screen.

||y you can create Bar Graphs,Pie,Variable Markers..
find the below screen shots .


Master Detail can support from Map view .

Customising Login pages,Images and Logos in OBIEE11G
Create a custom image in the standard size and keep in the following paths and restart the services .
To Change images :
Drive:\Obiee\user_projects\domains\bifoundation_domain\servers\AdminServer\tmp\.appmergegen_1307357397958\analytics.ear\ukjjdc\res
Drive:\Oracle\Middleware\user_projects\domains\bifoundation_domain\servers\bi_server1\tmp\_WL_user\analytics_11.1.1\7dezjl\war\res\s_blafp\images
Drive:\Oracle\Middleware\Oracle_BI1\bifoundation\web\app\res\s_blafp\images
Drive:\Oracle\Middleware\user_projects\domains\bifoundation_domain\servers\AdminServer\tmp\.appmergegen_1291264099332\analytics.ear\ukjjdc\res\s_blafp\images
To change logo and Login page in obiee 11g:
Drive:\Middleware\Oracle_BI1\bifoundation\web\app\res\sk_blafp\login
Drive:\Middleware\user_projects\domains\bifoundation_domain\servers\AdminServer\tmp\.appmergegen_1316154755380\analytics.ear\ukjjdc\res\sk_blafp\b_mozilla_4
Drive:\Middleware\user_projects\domains\bifoundation_domain\servers\AdminServer\tmp\.appmergegen_1316154755380\analytics.ear\ukjjdc\res\sk_blafp\login
Drive:\Middleware\user_projects\domains\bifoundation_domain\servers\bi_server1\tmp\_WL_user\analytics_11.1.1\7dezjl\war\res\sk_blafp\b_mozilla_4
Drive:\Middleware\user_projects\domains\bifoundation_domain\servers\bi_server1\tmp\_WL_user\analytics_11.1.1\7dezjl\war\res\sk_blafp\login
Thanks,To Change images :
Drive:\Obiee\user_projects\domains\bifoundation_domain\servers\AdminServer\tmp\.appmergegen_1307357397958\analytics.ear\ukjjdc\res
Drive:\Oracle\Middleware\user_projects\domains\bifoundation_domain\servers\bi_server1\tmp\_WL_user\analytics_11.1.1\7dezjl\war\res\s_blafp\images
Drive:\Oracle\Middleware\Oracle_BI1\bifoundation\web\app\res\s_blafp\images
Drive:\Oracle\Middleware\user_projects\domains\bifoundation_domain\servers\AdminServer\tmp\.appmergegen_1291264099332\analytics.ear\ukjjdc\res\s_blafp\images
To change logo and Login page in obiee 11g:
Drive:\Middleware\Oracle_BI1\bifoundation\web\app\res\sk_blafp\login
Drive:\Middleware\user_projects\domains\bifoundation_domain\servers\AdminServer\tmp\.appmergegen_1316154755380\analytics.ear\ukjjdc\res\sk_blafp\b_mozilla_4
Drive:\Middleware\user_projects\domains\bifoundation_domain\servers\AdminServer\tmp\.appmergegen_1316154755380\analytics.ear\ukjjdc\res\sk_blafp\login
Drive:\Middleware\user_projects\domains\bifoundation_domain\servers\bi_server1\tmp\_WL_user\analytics_11.1.1\7dezjl\war\res\sk_blafp\b_mozilla_4
Drive:\Middleware\user_projects\domains\bifoundation_domain\servers\bi_server1\tmp\_WL_user\analytics_11.1.1\7dezjl\war\res\sk_blafp\login
OBIEE 11G – Act as (Proxy user) Functionality (Step-By-Step)
The act as functionality is a proxy authentication functionality which authorize a user to act as an other user when navigating in BIPresentation Service.
When a user (called the proxy user) acts as another (called the target user), the proxy user can access the objects in the catalog for which the target user has permission.
Enabling a user to act for another is useful, for example:
Create table in database .
CREATE
TABLE OBEE11G_PROXY_ACTAS
(
PROXY_USER_ID VARCHAR2(30 BYTE) NOT NULL ,
PROXY_TARGET_ID VARCHAR2(30 BYTE) NOT NULL ,
PROXY_LEVEL VARCHAR2(10 BYTE) NOT NULL ,
CONSTRAINT OBEE11G_PROXY_ACTAS_PK PRIMARY KEY ( PROXY_USER_ID , PROXY_TARGET_ID )
ENABLE
) ;
PROXY_USER_ID : ID of the proxy user
PROXY_TARGET_ID : ID of the target user
PROXY_LEVEL : Proxy level (either full or restricted). A Restricted level gives you only a read access. (Note:Proxylevel value is case sensitive and must be all lowercase.)
Insert data into table . In my case data is
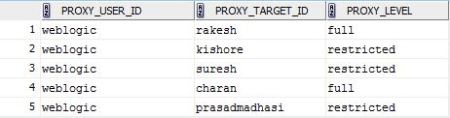
So, the proxy user weblogic should act as proxy target ID once we are done with this exercise .
Note : I created all PROXY_TRGET_ID users in weblogic console .(Click Here to to see how to create users in weblogic console)
Step2 :(Creating Session Variables for Proxy Functionality)
2.1 : Import OBEE11G_PROXY_ACTAS table into physical layer.

2.2: There are two system session variables along with their associated initialization blocks that you create to authenticate proxy users:
PROXY :
SELECT
PROXY_TARGET_ID
FROM
OBEE11G_PROXY_ACTAS
WHERE
UPPER(PROXY_USER_ID) = UPPER( ‘:USER’)
AND UPPER(PROXY_TARGET_ID) = UPPER(‘VALUEOF(NQ_SESSION.RUNAS)’)

PROXYLEVEL :
SELECT
PROXY_LEVEL
FROM
OBEE11G_PROXY_ACTAS
WHERE
UPPER(PROXY_USER_ID) = UPPER(‘:USER’)
AND UPPER(PROXY_TARGET_ID) = UPPER(‘VALUEOF(NQ_SESSION.RUNAS)’)
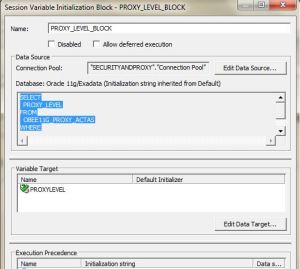
Step3:(Creating a Custom Message Template for Proxy Functionality)
You need to create a custom message template for the proxy functionality that contains the SQL to:
Get the list of target users that a proxy user can act as. This list appears in the User box in the Act As dialog box.
Verify whether the proxy user can act as the target user.
Get the list of proxy users that can act as the target user. This list appears on the target user’s My Account screen.
In this step create “LogonParamSQLTemplate.xml” file and place it under “<Middleware Home>\Oracle_BI1\bifoundation\web\msgdb\customMessages”
Note : If you dont find the folder ‘customMessages’ , then create create folder with the name ‘customMessages’ and place the ‘LogonParamSQLTemplate.xml’ file .
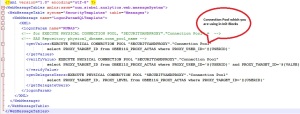
In my case the content of ‘LogonParamSQLTemplate.xml is’
<?xml version=”1.0″ encoding=”utf-8″ ?>
<WebMessageTables xmlns:sawm=”com.siebel.analytics.web.messageSystem”>
<WebMessageTable system=”SecurityTemplates” table=”Messages”>
<WebMessage name=”LogonParamSQLTemplate”>
<XML>
<logonParam name=”RUNAS”>
<!– for EXECUTE PHYSICAL CONNECTION POOL, “SECURITYANDPROXY”.”Connection Pool” = –>
<!– SAS Repository physical_dbname.conn_pool_name –>
<getValues>EXECUTE PHYSICAL CONNECTION POOL “SECURITYANDPROXY”.”Connection Pool”
select PROXY_TARGET_ID from OBEE11G_PROXY_ACTAS where PROXY_USER_ID=’@{USERID}’
</getValues>
<verifyValue> EXECUTE PHYSICAL CONNECTION POOL “SECURITYANDPROXY”.”Connection Pool”
select PROXY_TARGET_ID from OBEE11G_PROXY_ACTAS where PROXY_USER_ID=’@{USERID}’ and PROXY_TARGET_ID=’@{VALUE}’
</verifyValue>
<getDelegateUsers>EXECUTE PHYSICAL CONNECTION POOL “SECURITYANDPROXY”.”Connection Pool”
select PROXY_TARGET_ID, PROXY_LEVEL from OBEE11G_PROXY_ACTAS where PROXY_TARGET_ID=’@{USERID}’
</getDelegateUsers>
</logonParam>
</XML>
</WebMessage>
</WebMessageTable>
</WebMessageTables>
Step4:(Modifying the instanceconfig.xml File for Proxy Functionality)
You can modify the Oracle BI Presentation Services configuration file (instanceconfig.xml) to specify the following information for proxy functionality:
in the <TemplateMessageName> elements: The name of the custom message template in the Custom Messages folder (The default name is LogonParamSQLTemplate)
in the <MaxValues> elements: The maximum number of target users to be listed in the User box in the Act As dialog box. If the number of target users for a proxy user exceeds this value, an edit box, where the proxy user can type the ID of a target user, is rendered rather than a drop-down list of target users. The default is 200.
For example between the <ServerInstance> node, you can insert:
<LogonParam>
<TemplateMessageName>LogonParamSQLTemplate</TemplateMessageName>
<MaxValues>100</MaxValues>
</LogonParam>
The name that you specify in the <TemplateMessageName> element must match the name that you specify in the <WebMessage> element in the custom message file.

Restart Presentation Services .(Click here to see how to restart services)
Step5:(Assigning the privilege and restarting the BI Presentation Service)
For each user whom you want to authorize as a proxy user or for each Presentation Services group whose members you want to authorize as proxy users, you need to assign the Proxy privilege.
5.1: Login to Presentation services http://localhost:9704/analytics

5.2:Click in Administration

Click on Manage Privileges

Give Act As Proxy permission to the user ‘weblogic’

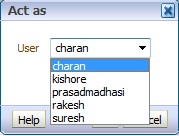
Now the user should be able to act as the users (PROXY_TARGET_ID) .

I hope this blog entry is helped you.
When a user (called the proxy user) acts as another (called the target user), the proxy user can access the objects in the catalog for which the target user has permission.
Enabling a user to act for another is useful, for example:
- when a manager wants to delegate some of his work to one of his direct reports
- when IT support staff wants to troubleshoot problems with another user’s objects.
Defining the Association Between Proxy Users and Target Users
Creating Session Variables for Proxy Functionality
Creating a Custom Message Template for Proxy Functionality
Modifying the instanceconfig.xml File for Proxy Functionality
Assigning the privilege and restarting the BI Presentation Service
Create table in database .
CREATE
TABLE OBEE11G_PROXY_ACTAS
(
PROXY_USER_ID VARCHAR2(30 BYTE) NOT NULL ,
PROXY_TARGET_ID VARCHAR2(30 BYTE) NOT NULL ,
PROXY_LEVEL VARCHAR2(10 BYTE) NOT NULL ,
CONSTRAINT OBEE11G_PROXY_ACTAS_PK PRIMARY KEY ( PROXY_USER_ID , PROXY_TARGET_ID )
ENABLE
) ;
PROXY_USER_ID : ID of the proxy user
PROXY_TARGET_ID : ID of the target user
PROXY_LEVEL : Proxy level (either full or restricted). A Restricted level gives you only a read access. (Note:Proxylevel value is case sensitive and must be all lowercase.)
Insert data into table . In my case data is

So, the proxy user weblogic should act as proxy target ID once we are done with this exercise .
Note : I created all PROXY_TRGET_ID users in weblogic console .(Click Here to to see how to create users in weblogic console)
Step2 :(Creating Session Variables for Proxy Functionality)
2.1 : Import OBEE11G_PROXY_ACTAS table into physical layer.

2.2: There are two system session variables along with their associated initialization blocks that you create to authenticate proxy users:
PROXY :
SELECT
PROXY_TARGET_ID
FROM
OBEE11G_PROXY_ACTAS
WHERE
UPPER(PROXY_USER_ID) = UPPER( ‘:USER’)
AND UPPER(PROXY_TARGET_ID) = UPPER(‘VALUEOF(NQ_SESSION.RUNAS)’)

PROXYLEVEL :
SELECT
PROXY_LEVEL
FROM
OBEE11G_PROXY_ACTAS
WHERE
UPPER(PROXY_USER_ID) = UPPER(‘:USER’)
AND UPPER(PROXY_TARGET_ID) = UPPER(‘VALUEOF(NQ_SESSION.RUNAS)’)

Step3:(Creating a Custom Message Template for Proxy Functionality)
You need to create a custom message template for the proxy functionality that contains the SQL to:
Get the list of target users that a proxy user can act as. This list appears in the User box in the Act As dialog box.
Verify whether the proxy user can act as the target user.
Get the list of proxy users that can act as the target user. This list appears on the target user’s My Account screen.
In this step create “LogonParamSQLTemplate.xml” file and place it under “<Middleware Home>\Oracle_BI1\bifoundation\web\msgdb\customMessages”
Note : If you dont find the folder ‘customMessages’ , then create create folder with the name ‘customMessages’ and place the ‘LogonParamSQLTemplate.xml’ file .
In my case the content of ‘LogonParamSQLTemplate.xml is’
<?xml version=”1.0″ encoding=”utf-8″ ?>
<WebMessageTables xmlns:sawm=”com.siebel.analytics.web.messageSystem”>
<WebMessageTable system=”SecurityTemplates” table=”Messages”>
<WebMessage name=”LogonParamSQLTemplate”>
<XML>
<logonParam name=”RUNAS”>
<!– for EXECUTE PHYSICAL CONNECTION POOL, “SECURITYANDPROXY”.”Connection Pool” = –>
<!– SAS Repository physical_dbname.conn_pool_name –>
<getValues>EXECUTE PHYSICAL CONNECTION POOL “SECURITYANDPROXY”.”Connection Pool”
select PROXY_TARGET_ID from OBEE11G_PROXY_ACTAS where PROXY_USER_ID=’@{USERID}’
</getValues>
<verifyValue> EXECUTE PHYSICAL CONNECTION POOL “SECURITYANDPROXY”.”Connection Pool”
select PROXY_TARGET_ID from OBEE11G_PROXY_ACTAS where PROXY_USER_ID=’@{USERID}’ and PROXY_TARGET_ID=’@{VALUE}’
</verifyValue>
<getDelegateUsers>EXECUTE PHYSICAL CONNECTION POOL “SECURITYANDPROXY”.”Connection Pool”
select PROXY_TARGET_ID, PROXY_LEVEL from OBEE11G_PROXY_ACTAS where PROXY_TARGET_ID=’@{USERID}’
</getDelegateUsers>
</logonParam>
</XML>
</WebMessage>
</WebMessageTable>
</WebMessageTables>

Step4:(Modifying the instanceconfig.xml File for Proxy Functionality)
You can modify the Oracle BI Presentation Services configuration file (instanceconfig.xml) to specify the following information for proxy functionality:
in the <TemplateMessageName> elements: The name of the custom message template in the Custom Messages folder (The default name is LogonParamSQLTemplate)
in the <MaxValues> elements: The maximum number of target users to be listed in the User box in the Act As dialog box. If the number of target users for a proxy user exceeds this value, an edit box, where the proxy user can type the ID of a target user, is rendered rather than a drop-down list of target users. The default is 200.
For example between the <ServerInstance> node, you can insert:
<LogonParam>
<TemplateMessageName>LogonParamSQLTemplate</TemplateMessageName>
<MaxValues>100</MaxValues>
</LogonParam>
The name that you specify in the <TemplateMessageName> element must match the name that you specify in the <WebMessage> element in the custom message file.

Restart Presentation Services .(Click here to see how to restart services)
Step5:(Assigning the privilege and restarting the BI Presentation Service)
For each user whom you want to authorize as a proxy user or for each Presentation Services group whose members you want to authorize as proxy users, you need to assign the Proxy privilege.
5.1: Login to Presentation services http://localhost:9704/analytics

5.2:Click in Administration

Click on Manage Privileges

Give Act As Proxy permission to the user ‘weblogic’

Now the user should be able to act as the users (PROXY_TARGET_ID) .


I hope this blog entry is helped you.
Satya Ranki Reddy


